SLVS737A February 2007 – July 2015 TPS62410
PRODUCTION DATA.
- 1 Features
- 2 Applications
- 3 Description
- 4 Revision History
- 5 Pin Configuration and Functions
- 6 Specifications
- 7 Detailed Description
- 8 Application and Implementation
- 9 Power Supply Recommendations
- 10Layout
- 11Device and Documentation Support
- 12Mechanical, Packaging, and Orderable Information
8 Application and Implementation
NOTE
Information in the following applications sections is not part of the TI component specification, and TI does not warrant its accuracy or completeness. TI’s customers are responsible for determining suitability of components for their purposes. Customers should validate and test their design implementation to confirm system functionality.
8.1 Application Information
8.1.1 Output Voltage Setting
8.1.1.1 Converter 1 Adjustable Default Output Voltage Setting
The output voltage can be calculated to:

To keep the operating current to a minimum, TI recommends selecting R12 within a range of 180 kΩ to 360 kΩ. The sum of R12 and R11 should not exceed approimately1 MΩ. For higher output voltages than 3.3 V, TI recommends choosing lower values than 180 kΩ for R12. Route the DEF_1 line away from noise sources, such as the inductor or the SW1 line. The FB1 line needs to be directly connected to the output capacitor. An internal feed-forward capacitor is connected to this pin, therefore there is no need for an external feed-forward capacitor for converter 1.
8.1.1.2 Converter 2
The default output voltage of converter 2 can be set by an external resistor network. For converter 2 the same recommendations apply as for converter 1. In addition to that, a 33-pF external feed-forward capacitor Cff2 for good load transient response must be used.
The output voltage can be calculated to:

Route the ADJ2 line away from noise sources, such as the inductor or the SW2 line. In case the interface is used for converter 2, connect ADJ2 pin directly to VOUT2
8.2 Typical Application
 Figure 14. Typical Application Circuit 1.5-V and 2.85-V Adjustable Outputs, Low PFM Voltage Ripple Optimized
8.2.1 Design Requirements
The step-down converter design can be adapted to different output voltage and load current needs by choosing appropriate external components. The following design procedure is adequate for whole VIN, VOUT and load current range of TPS62410.
8.2.2 Detailed Design Procedure
8.2.2.1 Output Filter Design (Inductor and Output Capacitor)
The device is optimized to operate with inductors of 2.2 μH to 4.7 μH and output capacitors of 10 μF to 22 μF.
For operation with a 2.2 μH inductor, a 22 μF capacitor is suggested.
8.2.2.1.1 Inductor Selection
The selected inductor has to be rated for its DC resistance and saturation current. The DC resistance of the inductance will influence directly the efficiency of the converter. Therefore an inductor with lowest DC resistance should be selected for highest efficiency.
Equation 6 calculates the maximum inductor current under static load conditions. The saturation current of the inductor should be rated higher than the maximum inductor current as calculated with Equation 7. This is recommended because during heavy load transient the inductor current will rise above the calculated value.


where
- f = Switching frequency (2.25 MHz typical)
- L = Inductor value
- ΔIL= Peak-to-peak inductor ripple current
- ILmax = Maximum inductor current
The highest inductor current will occur at maximum VIN.
Open core inductors have a soft saturation characteristic and they can usually handle higher inductor currents versus a comparable shielded inductor.
A more conservative approach is to select the inductor current rating just for the maximum switch current of the corresponding converter. It must be considered, that the core material from inductor to inductor differs and will have an impact on the efficiency especially at high switching frequencies.
Refer to Table 5 and the typical applications for possible inductors.
Table 5. List of Inductors
| DIMENSIONS [mm3] | INDUCTOR TYPE | SUPPLIER |
|---|---|---|
| 2.8 x 2.6 × 1.4 | VLF3014 | TDK |
| 3 × 3 × 1.4 | LPS3015 | Coilcraft |
| 3.9 × 3.9 × 1.7 | LPS4018 | Coilcraft |
8.2.2.1.2 Output Capacitor Selection
The advanced fast response voltage mode control scheme of the two converters allows the use of small ceramic capacitors with a typical value of 10 μF, without having large output voltage undershoots and overshoots during heavy load transients. Ceramic X7R/X5R capacitors having low ESR values result in lowest output voltage ripple and are therefore recommended.
If ceramic output capacitors are used, the capacitor RMS ripple current rating will always meet the application requirements. The RMS ripple current is calculated as:

At nominal load current the inductive converters operate in PWM mode and the overall output voltage ripple is the sum of the voltage spike caused by the output capacitor ESR plus the voltage ripple caused by charging and discharging the output capacitor:

Where the highest output voltage ripple occurs at the highest input voltage VIN.
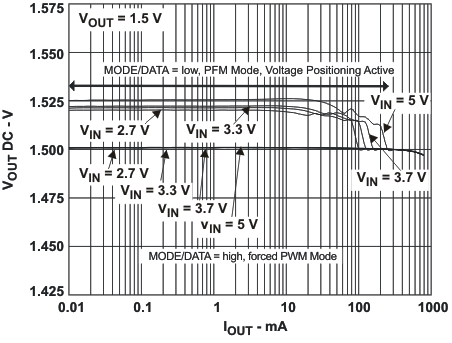
At light load currents the converters operate in power-save mode and the output voltage ripple is dependent on the output capacitor value. The output voltage ripple is set by the internal comparator delay and the external capacitor. Higher output capacitors like 22 μF values minimize the voltage ripple in PFM mode and tighten DC output accuracy in PFM mode.
8.2.2.1.3 Input Capacitor Selection
Because of the nature of the buck converter having a pulsating input current, a low ESR input capacitor is required for best input voltage filtering and minimizing the interference with other circuits caused by high input voltage spikes. The converters need a ceramic input capacitor of 10 μF. The input capacitor can be increased without any limit for better input voltage filtering.
8.2.3 Application Curves


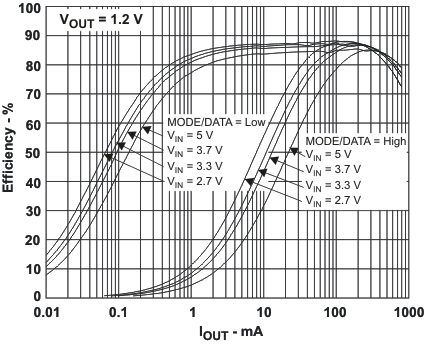
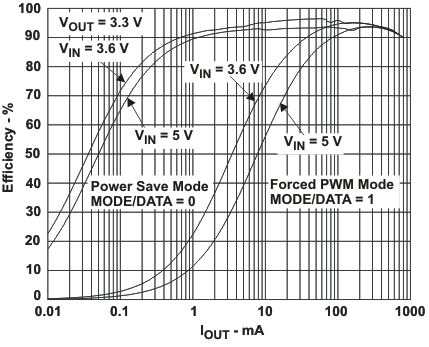
Power-Save Mode


