DLPU102C December 2020 – July 2024
- 1
- Trademarks
- 1Read This First
- 2DLP LightCrafter Dual DLPC900 EVM Overview
- 3Quick Start
-
4Operating the DLP LightCrafter Dual DLPC900 EVM
- 4.1 DLP LightCrafter Dual DLPC900 Control Software
- 4.2 PC Software
- 4.3 System Common Controls
- 4.4 System Settings
- 4.5 Video Mode
- 4.6
Pattern Modes
- 4.6.1 Menu Bar
- 4.6.2 Creating a Pattern Sequence in Pattern On-The-Fly Mode
- 4.6.3 Creating a Pattern Sequence in Pre-Stored Pattern Mode
- 4.6.4 Reordering a Pattern Sequence using the Edit LUT Feature
- 4.6.5 Creating a Pattern Sequence in Video Pattern Mode
- 4.6.6 Creating a Pattern Sequence With DMD Block Load
- 4.6.7 Pattern Settings
- 4.7 Batch Files
- 4.8 Peripherals Panel
- 4.9 Firmware
- 4.10 Reprogram Controller Board for a Different Supported DMD
- 4.11 Flash Device Parameters
- 4.12 JTAG Flash Programming
- 4.13 Programming an EDID
- 4.14 Intel (Altera) FPGA Programming
- 5Connectors
- 6Power Supply Requirements
- 7Safety
- 8Revision History
4.6.6 Creating a Pattern Sequence With DMD Block Load
Creating a pattern sequences with DMD Block Load achieves higher pattern rates by using a subset of the DMD blocks. See DMD Block Load command in the DLPC900 Software Programmer’s Guide (DLPU018) for a description of this command.
Follow these steps to create a Pattern On-The-Fly pattern sequence with only three DMD active blocks.
- Make sure the EVM is powered up and operating correctly, and the Connected radio-button is lit green.
- Select Pattern On-The-Fly Mode from the Operating Mode group box, and then select the Pattern Design button so that the large black panel is displayed as shown in Figure 4-6.
- Select the Load button from the menu bar and select the Block_Load.txt file located in the sample images directory. Be sure to select the correct file for the EVM being used.
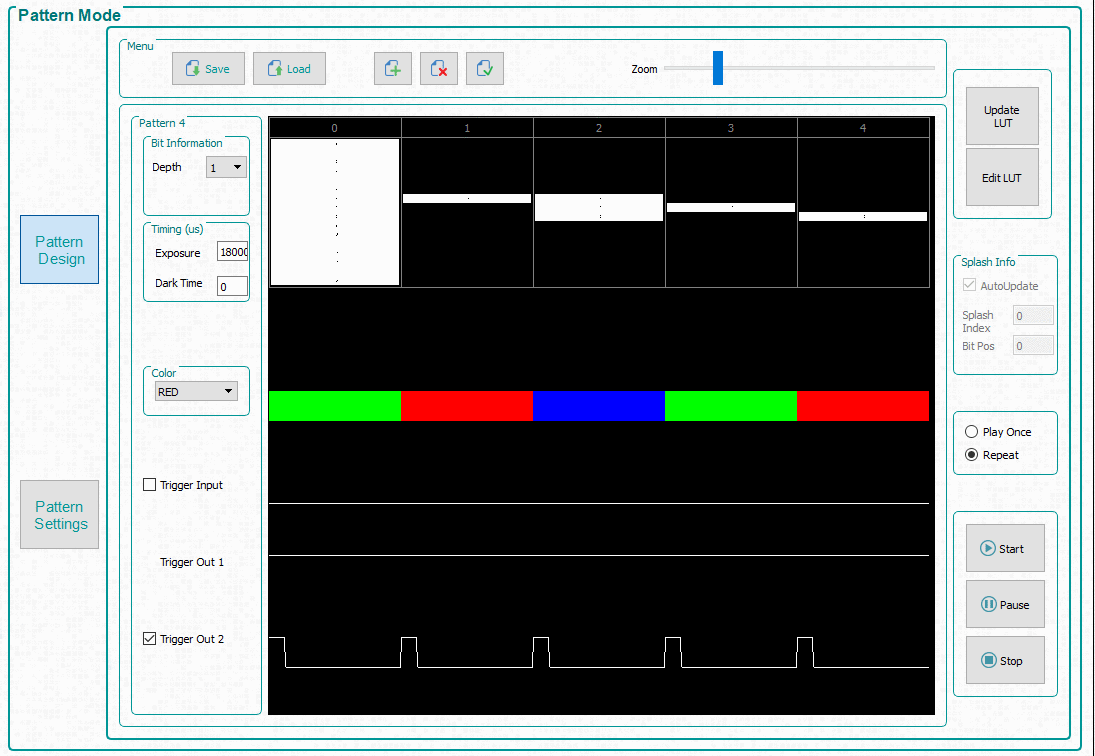
- The pattern design looks similar to Figure 4-15.
- Select the Pattern Settings button.
- Within the DMD Active Blocks, select 6 for the Start Block and select 8 for the End Block, and then Select Set.
- Select the Pattern Design button.
- Select the Update LUT button.
- Select the Start button to run the sequence. The system only loads data in blocks 6, 7, and 8 regardless of the thumbnail image shown in the Pattern Design window and displays each pattern for 180,000 μs.
- Select the Stop button to end this example.
Notice that pattern 0 is displayed the same way as pattern 2 even though pattern 0 contains image data for all blocks showing that only blocks 6, 7, and 8 are active while all other blocks are in the off state.
The performance of the mirrors in the blocks that are not active are affected by prolonged use of being in the off state. Enable DMD Idle Mode as often as possible to optimize the mirrors. This mode provides a 50/50 duty cycle across the entire DMD mirror array, where the mirrors are continuously flipped between the on and off states. See DMD Idle Mode command in the DLPC900 Software Programmer’s Guide (DLPU018) for a description of this command. The DMD Idle Mode command is located in Section 4.6.7 within the Pattern Mode panel.
 Figure 4-15 DMD Block Load Pattern Sequence