SLAU903 October   2023


  1.   1
  2.   Description
  3.   Get Started
  4.   Features
  5.   Applications
  6.   6
  7. 1Evaluation Module Overview
    1. 1.1 Introduction
    2. 1.2 Kit Contents
    3. 1.3 Specification
    4. 1.4 Device Information
  8. 2Hardware
    1. 2.1 Hardware Overview
    2. 2.2 AC-MB Settings
      1. 2.2.1 Audio Serial Interface Settings
        1. 2.2.1.1 USB Mode
        2. 2.2.1.2 Optical or Auxiliary Analog Audio Input Mode
        3. 2.2.1.3 External Audio Interface Mode
      2. 2.2.2 AC-MB Power Supply
    3. 2.3 TAx5x1xQ1EVM-K Hardware Settings
      1. 2.3.1 TAx5412-Q1 EVM Input Hardware Settings
        1. 2.3.1.1 Line Inputs
        2. 2.3.1.2 On-board Microphone Input
      2. 2.3.2 TAC541x-Q1 EVM Output Hardware Settings
    4. 2.4 Diagnostics Hardware Setup
      1. 2.4.1 Short to MICBIAS Setup
      2. 2.4.2 Short to VBAT Setup
      3. 2.4.3 Shorted Input Pins Setup
      4. 2.4.4 Short to GND Setup
    5. 2.5 GPIO1 Hardware Configurations
  9. 3Software
    1. 3.1 Software Description
    2. 3.2 PurePath Console 3 Installation
      1. 3.2.1 USB Audio Setup
    3. 3.3 TAx5x1x-Q1 EVM GUI
      1. 3.3.1 Software Overview
      2. 3.3.2 Configuration View
        1. 3.3.2.1 Device Config Tab
        2. 3.3.2.2 Record Config Tab
        3. 3.3.2.3 Playback Config Tab
        4. 3.3.2.4 Audio Serial Bus Tab
          1. 3.3.2.4.1 Configuring Primary Audio Serial Bus
          2. 3.3.2.4.2 Configuring Secondary Audio Serial Bus
          3. 3.3.2.4.3 Example Configuring I2S Interface
        5. 3.3.2.5 GPIO/Interrupts Tab
        6. 3.3.2.6 Advanced Tabs
          1. 3.3.2.6.1 Diagnostic Tab
          2. 3.3.2.6.2 Programmable Biquads Tab
          3. 3.3.2.6.3 Automatic Gain Control (AGC) Tab
          4. 3.3.2.6.4 Voice/Ultrasonic Auto Detection (VAD/UAD) Tab
          5. 3.3.2.6.5 Mixer Tab
          6. 3.3.2.6.6 Tone Generation Tab
          7. 3.3.2.6.7 Limiter Tab
        7. 3.3.2.7 End System Integration View
        8. 3.3.2.8 Register Map View
        9. 3.3.2.9 I2C Monitor View
    4. 3.4 Configuration Examples
    5. 3.5 System Overview
  10. 4Hardware Design Files
    1. 4.1 Schematics
    2. 4.2 PCB Layouts
    3. 4.3 Bill of Materials (BOM)
      1. 4.3.1 TAC5412-Q1 EVM Bill of Materials
      2. 4.3.2 TAC5311-Q1 EVM Bill of Materials
      3. 4.3.3 TAA5412-Q1 EVM Bill of Materials
  11. 5Additional Information
    1. 5.1 Trademarks
  12. 6References

Optical or Auxiliary Analog Audio Input Mode

Serial interface signals are provided from the PCM9211 digital transceiver, which is capable of sending digital data to the EVM from an analog input or optical input. Meanwhile, the data from the EVM can be streamed through the optical output.

Figure 3-4 shows the AC-MB audio setting for the optical and analog mode of operation.
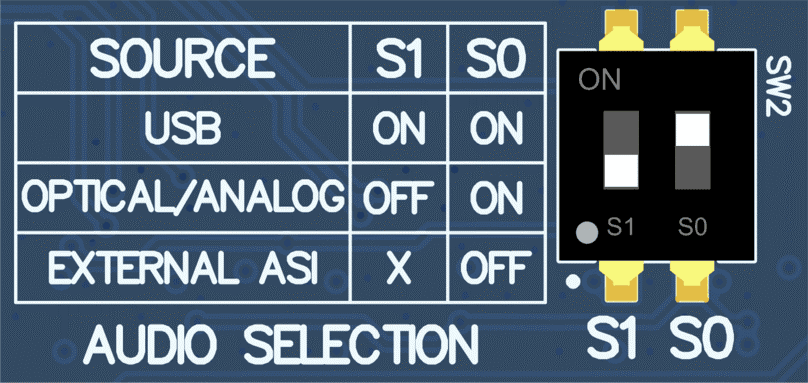
GUID-20230507-SS0I-KVMC-XSNQ-M8LPFQMCPCC2-low.pngFigure 2-4 AC-MB Optical or Auxiliary Analog Audio Input Setting

The optical output of the AC-MB streams the data captured on the EVM with the format determined by the input source used. When there is an optical input connected, the LOCK LED must be ON, and the PCM9211 streams the audio serial interface clocks with the format determined by the optical input frame. The digital data from the optical input is streamed to the evaluation module. If the optical input is not connected, then the PCM9211 captures the input signal provided through the analog input, and streams the signal to the evaluation module. This feature can be useful when a digital input digital-to-analog converter (DAC) is connected to the AC-MB, providing an analog input for quick evaluation. In auxiliary analog audio mode, the audio serial interface format is fixed to a 24-bit, 48-kHz, I2S mode.