SLVUC46D March   2021  – November 2023


  1.   1
  2.   Abstract
  3.   Trademarks
  4. 1Introduction
    1. 1.1 Overview
      1. 1.1.1 Purpose and Scope
  5. 2Evaluation Hardware Overview
    1. 2.1 Connections Overview
    2. 2.2 Connection Details
      1. 2.2.1 Common Connectors and Headers Across all EVM Variants
      2. 2.2.2 MCU Reset and User Button
      3. 2.2.3 Communication Interfaces
      4. 2.2.4 Supply Input
      5. 2.2.5 Current Limit Header (RIPROPI)
      6. 2.2.6 Device Signal and Control Header
      7. 2.2.7 Device Signal Test Points
    3. 2.3 LED Indicators
    4. 2.4 Headers and Connectors (Hardware Device Variant)
    5. 2.5 Headers and Connectors (SPI variant)
  6. 3EVM GUI Control Application
    1. 3.1 MSP430 FET Drivers
    2. 3.2 Cloud-based GUI
    3. 3.3 Local Installation
  7. 4EVM GUI Operation
    1. 4.1 Hardware Setup
    2. 4.2 Launching the DRV824x_DRV814x-Q1EVM GUI Application
    3. 4.3 Using the DRV824x_DRV814x-Q1EVM GUI Application
      1. 4.3.1 Register Map Page (SPI Device Variant)
      2. 4.3.2 Driver Control Page (SPI Device Variant)
      3. 4.3.3 Driver Control Page (HW Device Variant)
      4. 4.3.4 Updating Firmware
  8. 5Revision History

Headers and Connectors (Hardware Device Variant)

Figure 2-8 shows all configuration jumpers for the DRV824xH-Q1 hardware variant. DRV814xH-Q1 features the same jumpers, with the exception of MODE. Each LVL silkscreen label directly corresponds to the data sheet description. Changing the jumper within MODE allows the user to use the driver in PH/EN, PWM, and Independent Half-Bridge mode. Please refer to the device data sheet for more information regarding pin LVL settings and associated configuration.

Note: IPROPI is common to both hardware and SPI EVM/ device variants and performs the same function.
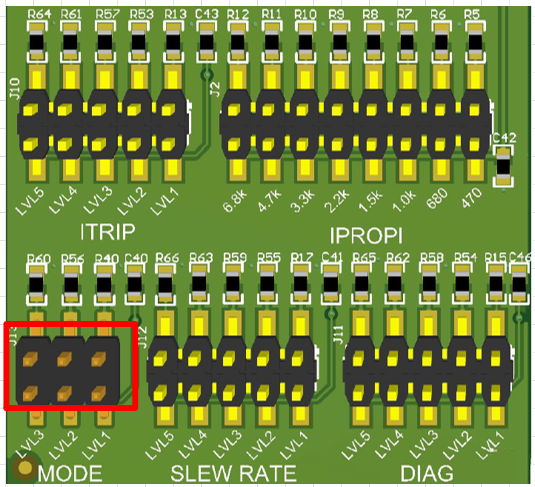
GUID-66D2C99C-6553-4E55-B65E-7770D5BE5718-low.png Figure 2-8 DRV824x and DRV814x Hardware Variant Configuration Jumpers