SNLU223D August 2017 – February 2023 DS90UB954-Q1
- DS90UB954-Q1EVM Deserializer User's Guide
- 1 Trademarks
- 2 Introduction
- 3 Quick Start Guide
- 4 DS90UB954-Q1EVM Board Configuration
- 5 Enable and Reset
- 6 Use with DS90UB936-Q1
- 7 Typical Connection and Test Equipment
- 8 Termination Device
- 9 Typical Test Setup
- 10Equipment References
- 11Cable References
- 12Software for DS90UB954Q1-EVM Evaluation - Analog LaunchPAD (ALP) Software Setup
- 13Using ALP and DS90UB954 Profile
- 14Troubleshooting ALP Software
- 15DS90UB954-Q1EVM PCB Schematics, Layout and Bill of Materials - DS90UB954-Q1EVM Schematic
- 16DS90UB954-Q1 EVM PCB Layout
- 17DS90UB954-Q1EVM Bill of Materials
- 18Revision History
4.3 Power-over-Coax Interface
The DS90UB954-Q1EVM offers two Power-over-Coax interfaces (PoC) to connect cameras through a coaxial cable with FAKRA connectors. Power is delivered on the same conductor that is used to transmit video and control channel data between the host and the camera. By default, 5V power supply is applied over the coax cable. Refer to for other PoC configurations.
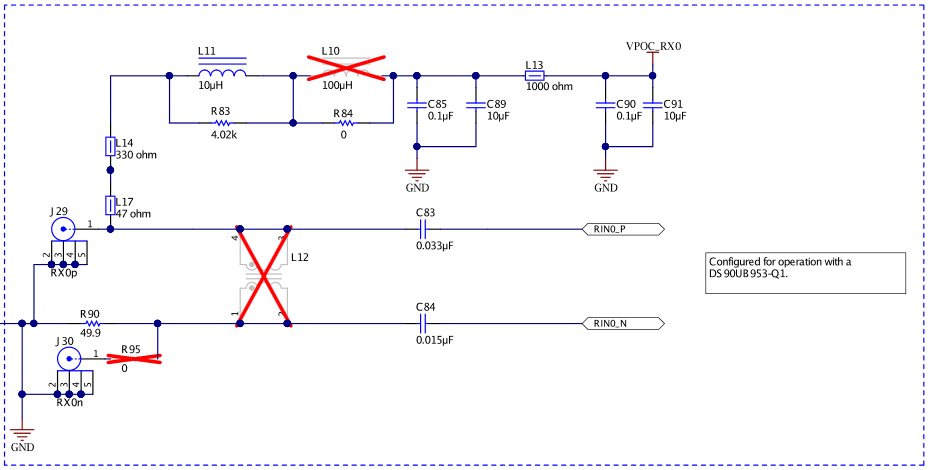
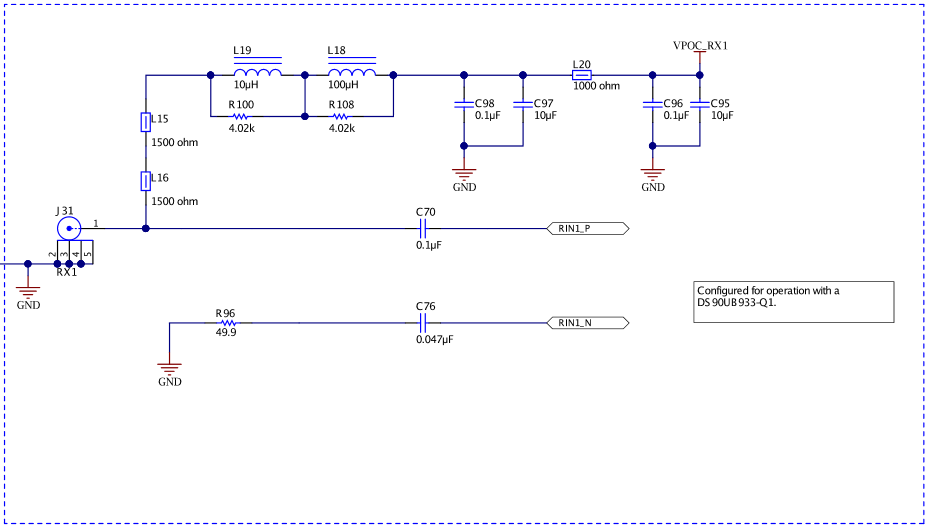
For port RX0, the PoC network is configured for a DS90UB953-Q1EVM (or variant), and for RX1 the PoC network is configured for a DS90UB933-Q1. Only use a serializer EVM with the correct PoC network. To use PoC with two DS90UB953-Q1EVM (or variant) or DS90UB933-Q1 EVM's, one of the PoC networks must be reworked. You may also open the PoC circuit and power the serializer EVM directly from another supply.
For Power-over-Coax (PoC) on the EVM, the circuit uses a filter network as shown in #T3978478-1. The PoC network frequency response corresponds to the bandwidth compatible with DS90UB953-Q1EVM (or variant) chipsets.
 Figure 4-2 Power-over-Coax Network For Use With DS90UB953
 Figure 4-3 Power-over-Coax Network For Use With DS90UB933
Verify that the Power-over-Coax voltage is properly set before plugging into RX0 or RX1. Power supply is not fused. Over-voltage will cause damage to boards directly connected due to incorrect input power supplies. DS90UB913A-Q1EVM is designed for a maximum of 5V PoC. To use DS90UB913A-Q1EVM with DS90UB954-Q1EVM, open J17 or J18 to disable PoC, and either power the DS90UB913A-Q1EVM separately or by applying 5V to the J17 or J18 pin on DS90UB954-Q1EVM.
| Reference | Signal | Description |
|---|---|---|
| J18 | VPOC_RX0 | This sets the voltage for Power-over-Coax on RX0 |
| Jumper installed: +9V power supply from VPOC_LDO0_9V | ||
| Jumper Open: No PoC connected. Apply power to pin1 or leave open and power serializer separately. | ||
| J17 | VPOC_RX1 | This sets the voltage for Power-over-Coax on RX1 |
| Jumper installed: +9V power supply from VPOC_LDO1_9V | ||
| Jumper Open: No PoC connected. Apply power to pin1 or leave open and power serializer separately. |