SPMA041G January 2012 – October 2015 TM4C1230C3PM , TM4C1230C3PM , TM4C1230D5PM , TM4C1230D5PM , TM4C1230E6PM , TM4C1230E6PM , TM4C1230H6PM , TM4C1230H6PM , TM4C1231C3PM , TM4C1231C3PM , TM4C1231D5PM , TM4C1231D5PM , TM4C1231D5PZ , TM4C1231D5PZ , TM4C1231E6PM , TM4C1231E6PM , TM4C1231E6PZ , TM4C1231E6PZ , TM4C1231H6PGE , TM4C1231H6PGE , TM4C1231H6PM , TM4C1231H6PM , TM4C1231H6PZ , TM4C1231H6PZ , TM4C1232C3PM , TM4C1232C3PM , TM4C1232D5PM , TM4C1232D5PM , TM4C1232E6PM , TM4C1232E6PM , TM4C1232H6PM , TM4C1232H6PM , TM4C1233C3PM , TM4C1233C3PM , TM4C1233D5PM , TM4C1233D5PM , TM4C1233D5PZ , TM4C1233D5PZ , TM4C1233E6PM , TM4C1233E6PM , TM4C1233E6PZ , TM4C1233E6PZ , TM4C1233H6PGE , TM4C1233H6PGE , TM4C1233H6PM , TM4C1233H6PM , TM4C1233H6PZ , TM4C1233H6PZ , TM4C1236D5PM , TM4C1236D5PM , TM4C1236E6PM , TM4C1236E6PM , TM4C1236H6PM , TM4C1236H6PM , TM4C1237D5PM , TM4C1237D5PM , TM4C1237D5PZ , TM4C1237D5PZ , TM4C1237E6PM , TM4C1237E6PM , TM4C1237E6PZ , TM4C1237E6PZ , TM4C1237H6PGE , TM4C1237H6PGE , TM4C1237H6PM , TM4C1237H6PM , TM4C1237H6PZ , TM4C1237H6PZ , TM4C123AE6PM , TM4C123AE6PM , TM4C123AH6PM , TM4C123AH6PM , TM4C123BE6PM , TM4C123BE6PM , TM4C123BE6PZ , TM4C123BE6PZ , TM4C123BH6PGE , TM4C123BH6PGE , TM4C123BH6PM , TM4C123BH6PM , TM4C123BH6PZ , TM4C123BH6PZ , TM4C123BH6ZRB , TM4C123BH6ZRB , TM4C123FE6PM , TM4C123FE6PM , TM4C123FH6PM , TM4C123FH6PM , TM4C123GE6PM , TM4C123GE6PM , TM4C123GE6PZ , TM4C123GE6PZ , TM4C123GH6PGE , TM4C123GH6PGE , TM4C123GH6PM , TM4C123GH6PM , TM4C123GH6PZ , TM4C123GH6PZ , TM4C123GH6ZRB , TM4C123GH6ZRB , TM4C123GH6ZXR , TM4C123GH6ZXR , TM4C1290NCPDT , TM4C1290NCPDT , TM4C1290NCZAD , TM4C1290NCZAD , TM4C1292NCPDT , TM4C1292NCPDT , TM4C1292NCZAD , TM4C1292NCZAD , TM4C1294KCPDT , TM4C1294KCPDT , TM4C1294NCPDT , TM4C1294NCPDT , TM4C1294NCZAD , TM4C1294NCZAD , TM4C1297NCZAD , TM4C1297NCZAD , TM4C1299KCZAD , TM4C1299KCZAD , TM4C1299NCZAD , TM4C1299NCZAD , TM4C129CNCPDT , TM4C129CNCPDT , TM4C129CNCZAD , TM4C129CNCZAD , TM4C129DNCPDT , TM4C129DNCPDT , TM4C129DNCZAD , TM4C129DNCZAD , TM4C129EKCPDT , TM4C129EKCPDT , TM4C129ENCPDT , TM4C129ENCPDT , TM4C129ENCZAD , TM4C129ENCZAD , TM4C129LNCZAD , TM4C129LNCZAD , TM4C129XKCZAD , TM4C129XKCZAD , TM4C129XNCZAD , TM4C129XNCZAD
4.3 Editing the Example Project Settings
Before building the example projects, it is necessary to properly configure the project settings:
- Right-click the project in the Project Explorer and select Properties.
- Expand the Build entry, and then expand the ARM Compiler entry.
- Confirm that the Target_processor version (--silicon_version, -mv) entry matches your processor in the Processor Options panel (see Figure 17). For this example, the Target processor should be 7M4 (as opposed to 7M3 for any of the Stellaris Cortex-M3 products).
- Click the Optimization level (--opt_level, -O) drop-down menu and select 2 in the Optimization panel (see Figure 18).
- Expand the Advanced Options section of the ARM Compiler pane, and select Assembler Options.
- Click the Use unified assembly language (--ual) checkbox to select that option (see Figure 19).
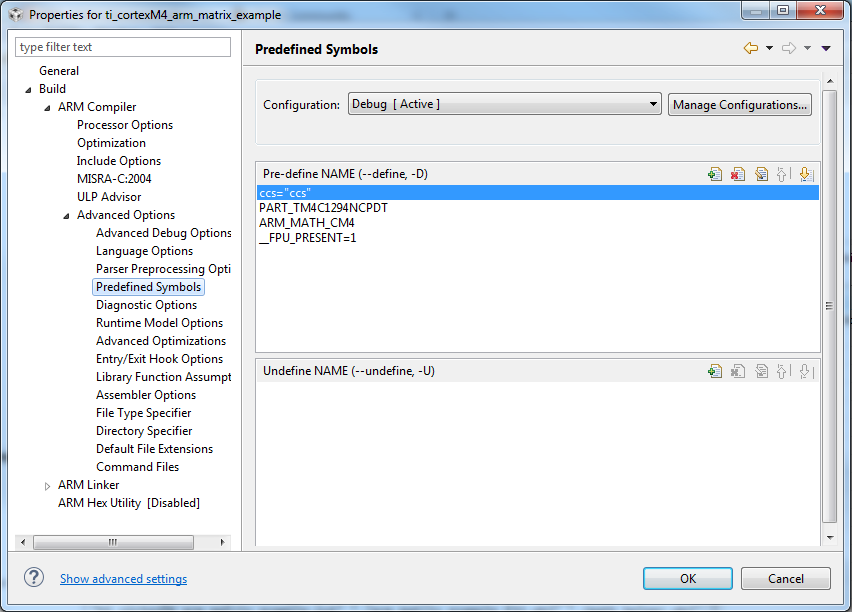
- Expand the Advanced Options menu again and select the Predefined Symbols panel. Create a symbol to tell the DSP library to use Cortex-M4 based math functions. Click the Add... button in the Pre-define NAME (--define, -D) area. In the Enter Value dialog box, type ARM_MATH_CM4 into the Pre-define NAME (--define, -D) field and click OK (see Figure 20). Click the Add... button in the Pre-define NAME (--define, -D) area. In the Enter Value dialog box, type __FPU_PRESENT=1 into the Pre-define NAME (--define -D) field and click OK.
- Look for the Add button to #include search path (--include_path, -I) field in the Include Options section (see Figure 22).
- Click the Add… button again, then the Browse button and browse to the Include directory located in the CMSIS directory, then click OK (see Figure 21).
- Select the on option from the Place each function in a separate subsection (--gen_func_subsections, -ms) drop-down menu (see Figure 23), in the Runtime Model Options panel.
- Open the File Search Path panel in the ARM Linker section.
- Create an entry for the precompiled CMSIS DSP binary (.lib) that will be used in the Include library file or command file as input (--library, -l) area (see Figure 24). For this example, the library file created in section three will be used, so click on the Add… button, then the File system… button and navigate to the location of the .lib you want to use. If you built the precompiled binary from scratch as detailed in section 3 without changing the default project location, the .lib will be found at C:\Users\<user_name>\CCS workspaces\<your workspace>\dsplib-cm4f\Debug\dsplib-cm4f.lib. When you have found the binary, click Open, then OK.
 Figure 17. The Processor Options Used for Building the Example on a Cortex-M4 Process With hardware FPU Support
  Figure 18. The Proper Optimization Settings for Compiling the Example Projects
  Figure 19. The Proper Assembler Options Needed for Compiling the Example Projects
  Figure 20. Adding the Pre-Processor Statements Necessary for Building an Example Project on a Cortex-M4 Part With Hardware FPU Support
  Figure 21. Compiler's #include Search Path Modified to Contain Both the Base CMSIS Include Directory and the Example Projects' Common Include Directory
  Figure 22. Using the File System Option to Add the Base CMSIS Include Directory to the Compiler's #include Search Path
  Figure 23. The Runtime Model Options Set Up for Compiling the Example Projects
  Figure 24. The Linker's File Search Path Modified to Include the dsplib Binary Compiled in Section 3