SPRUJF4A October 2024 – December 2024
- 1
- Description
- Features
- Applications
- 5
- 1Evaluation Module Overview
- 2Hardware
- 3Motor Control Software
-
4Test Procedure and Results
- 4.1 Build Level 1: CPU and Board Setup
- 4.2 Build Level 2: Open-Loop Check With ADC Feedback
- 4.3 Build Level 3: Closed Current Loop Check
- 4.4 Build Level 4: Full Motor Drive Control
- 4.5 Test Procedure
- 4.6 Performance Data and Results
- 5Hardware Design Files
- 6Additional Information
- 7References
- 8Revision History
3.2.4 Project Structure
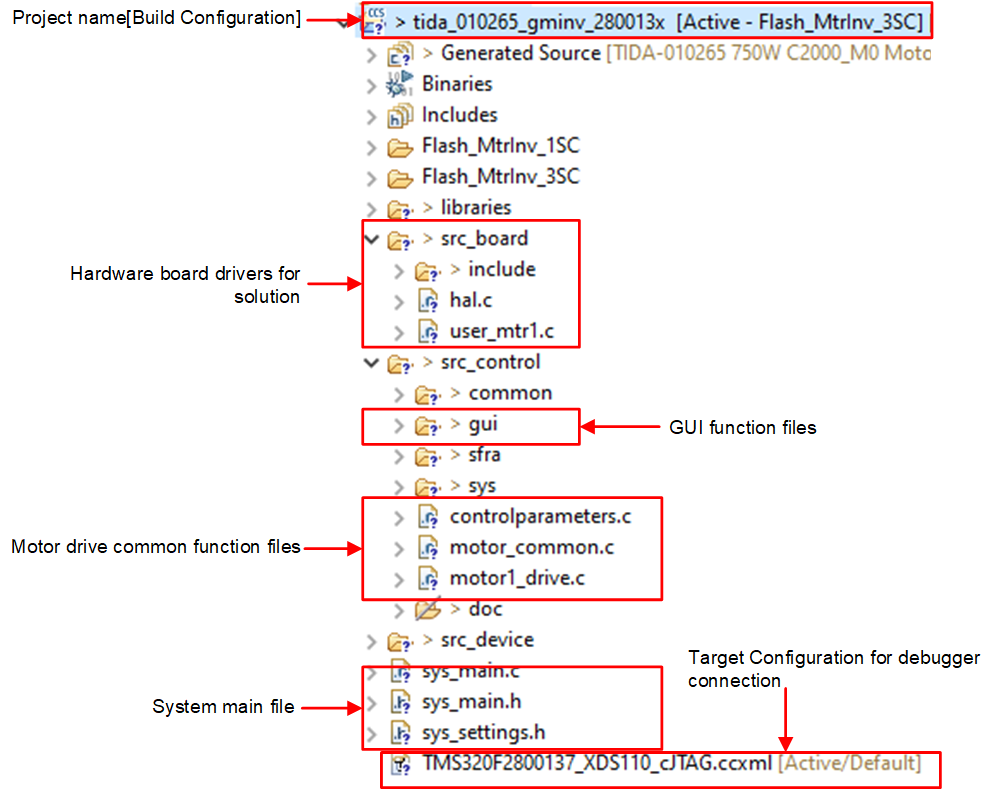
Once the project is imported, the project explore appears inside CCS as shown in Figure 3-25.
The folder src_board includes device peripheral configuration. This configuration is done with driverlib from C2000Ware. MCU configuration is generally located in the Hardware Access Layer (HAL) files, hal.c and hal.h. This folder also contains user_mtr1.c, in which various parameters are calculated or assigned. In most use cases, any parameters fully defined or derived in this file will not need to be adjusted by the user.
The folder src_control includes motor drive files that call motor control core algorithm functions within the interrupt service routines and background tasks. This folder also holds various secondary functionalities, such as SFRA, the GUI interface, and so forth.
The folder src_control/common/include holds various header files useful to the system. Of these, the most notable is user_mtr1.h, which contains the motor and system parameter definitions.
The folder src_device holds driverlib, used by the HAL.
The folder src_sta holds self-test application code.
 Figure 3-25 TIEVM-MTR-HVINV Project Explorer View
Figure 3-26 shows the project software flow diagram of ISR for motor control, a main loop for motor control parameters update in background loop.
 Figure 3-26 Firmware Project Flow Diagram
The project consists of a motor control interrupt service routine, which are called every PWM cycle. A few background tasks are called in a loop forever in main() and can be used to run slow tasks for which absolute timing accuracy is not required, motor control parameters update, and so on. A CPU timer is used to trigger slow background tasks.
motor1CtrlISR is reserved for calling the motor drive control algorithms to spin the motor 1 that is periodically triggered at the user-defined rate of USER_M1_ISR_FREQ_Hz.
To simplify the system, the design of the software for this EVM is organized into four labs with incremental builds (DMC_BUILDLEVEL), which makes learning and getting familiar with the board and software easier. This approach is also good for debugging and testing boards. Table 3-1 lists the detailed incremental build options. To select a particular build option, select the corresponding BUILDLEVEL option in sys_settings.h. Once the build option is selected, compile the project by selecting the rebuild all compiler option. Section 4.5 provides more details to run each of the build level options.
| OPERATION | BUILD OPTION | DESCRIPTION |
|---|---|---|
| MOTOR DRIVE | DMC_LEVEL_1 | 50% PWM duty, verify ADC offset calibration, PWM output and phase shift |
| DMC_LEVEL_2 | Open-loop v/f control to check current and voltage sensing signals for motor | |
| DMC_LEVEL_3 | Closed current loop to check the hardware settings | |
| DMC_LEVEL_4 | Motor parameters identify and run with InstaSPIN-FOC or eSMO |