DLPU018J October   2014  – June 2024 DLPC900


  1.   1
  2.   Read This First
    1.     About This Manual
    2.     Related Documents from Texas Instruments
    3.     If You Need Assistance
    4.     Trademarks
  3. 1Interface Protocol
    1. 1.1 I2C Interface
      1. 1.1.1 I2C Transaction Structure
        1. 1.1.1.1 I2C START Condition
        2. 1.1.1.2 I2C STOP Condition
        3. 1.1.1.3 DLPC900 I2C Secondary Controller Address 
        4. 1.1.1.4 DLPC900 I2C Sub-Address and Data Bytes
      2. 1.1.2 Example I2C Read Command Sequence
        1. 1.1.2.1 I2C Read Command Example with Parameters
      3. 1.1.3 Example I2C Write Command Sequence
    2. 1.2 USB Interface
      1. 1.2.1 USB Transaction Sequence
      2. 1.2.2 USB Read Transaction Sequence Example
      3. 1.2.3 USB Write Transaction Sequence Example
    3. 1.3 INIT_DONE Signal
  4. 2DLPC900 Control Commands
    1. 2.1 DLPC900 Status Commands
      1. 2.1.1 Hardware Status
      2. 2.1.2 System Status
      3. 2.1.3 Main Status
      4. 2.1.4 Retrieve Firmware Version
      5. 2.1.5 Reading Hardware Configuration and Firmware Tag Information
      6. 2.1.6 Read Error Code
      7. 2.1.7 Read Error Description
    2. 2.2 DLPC900 Firmware Programming Commands
      1. 2.2.1  Read Status
      2. 2.2.2  Enter Program Mode
      3. 2.2.3  Exit Program Mode
      4. 2.2.4  Read Control
      5. 2.2.5  Start Address
      6. 2.2.6  Erase Sector
      7. 2.2.7  Download Flash Data Size
      8. 2.2.8  Download Data
      9. 2.2.9  Calculate Checksum
      10. 2.2.10 Controller Enable/Disable Command
    3. 2.3 Chipset Control Commands
      1. 2.3.1  Chipset Configuration Commands
        1. 2.3.1.1 Power Mode
        2. 2.3.1.2 DMD Standby and Idle Modes
        3. 2.3.1.3 DMD Park/Unpark (No Longer Recommended)
        4. 2.3.1.4 Curtain Color
      2. 2.3.2  Parallel Interface Configuration
        1. 2.3.2.1 Parallel Port Configuration
        2. 2.3.2.2 Input Data Channel Swap
      3. 2.3.3  Input Source Commands
        1. 2.3.3.1 Port and Clock Configuration
        2. 2.3.3.2 Input Source Configuration
        3. 2.3.3.3 Input Pixel Data Format
        4. 2.3.3.4 Internal Test Pattern Select
        5. 2.3.3.5 Internal Test Patterns Color
        6. 2.3.3.6 Load Image
      4. 2.3.4  Image Flip
        1. 2.3.4.1 Long-Axis Image Flip
        2. 2.3.4.2 Short Axis Image Flip
      5. 2.3.5  IT6535 Power Mode
      6. 2.3.6  Gamma Configuration and Enable
      7. 2.3.7  LED Driver Commands
        1. 2.3.7.1 LED Enable Outputs
          1. 2.3.7.1.1 LED PWM Polarity
        2. 2.3.7.2 LED Driver Current
        3. 2.3.7.3 Minimum LED Pulse Width in microseconds (µs)
        4. 2.3.7.4 Minimum LED Pulse Width in nanoseconds (ns)
        5. 2.3.7.5 Get Minimum LED Pattern Exposure in microseconds (µs)
        6. 2.3.7.6 Get Minimum LED Pattern Exposure in nanoseconds (ns)
      8. 2.3.8  GPIO Commands
        1. 2.3.8.1 GPIO Configuration
        2. 2.3.8.2 GPIO Clock Configuration
        3. 2.3.8.3 GPIO Busy
      9. 2.3.9  Pulse Width Modulated (PWM) Control
        1. 2.3.9.1 PWM Setup
        2. 2.3.9.2 PWM Enable
      10. 2.3.10 Batch File Commands
        1. 2.3.10.1 Batch File Name
        2. 2.3.10.2 Batch File Execute
        3. 2.3.10.3 Batch File Delay
        4. 2.3.10.4 Batch File Example
    4. 2.4 Display Mode Commands
      1. 2.4.1 Display Mode Selection
        1. 2.4.1.1 Video Mode Resolution
        2. 2.4.1.2 Input Display Resolution
        3. 2.4.1.3 DMD Block Load
        4. 2.4.1.4 Minimum Exposure Times
      2. 2.4.2 Image Header
      3. 2.4.3 Pattern Image Compression
        1. 2.4.3.1 Run-Length Encoding
          1. 2.4.3.1.1 RLE Compression Example
        2. 2.4.3.2 Enhanced Run-Length Encoding
          1. 2.4.3.2.1 Enhanced RLE Compression Example
          2. 2.4.3.2.2 End of Image Padding
      4. 2.4.4 Pattern Display Commands
        1. 2.4.4.1 Trigger Commands
          1. 2.4.4.1.1 Trigger Out 1
          2. 2.4.4.1.2 Trigger Out 2
          3. 2.4.4.1.3 Trigger In 1
          4. 2.4.4.1.4 Trigger In 2
        2. 2.4.4.2 LED Enable Delay Commands
          1. 2.4.4.2.1 Red LED Enable Delay
          2. 2.4.4.2.2 Green LED Enable Delay
          3. 2.4.4.2.3 Blue LED Enable Delay
        3. 2.4.4.3 Pattern Display Commands
          1. 2.4.4.3.1 Pattern Display Start/Stop
          2. 2.4.4.3.2 Pattern Display Invert Data
          3. 2.4.4.3.3 Pattern Display LUT Configuration
          4. 2.4.4.3.4 Pattern Display LUT Reorder Configuration
          5. 2.4.4.3.5 Pattern Display LUT Definition
        4. 2.4.4.4 Pattern On-The-Fly Commands
          1. 2.4.4.4.1 Initialize Pattern BMP Load
          2. 2.4.4.4.2 Pattern BMP Load
        5. 2.4.4.5 I2C Pass Through Commands
          1. 2.4.4.5.1 I2C Pass Through Configuration
          2. 2.4.4.5.2 I2C Pass Through Write
          3. 2.4.4.5.3 I2C Pass Through Read
    5. 2.5 Debug Mode Commands
      1. 2.5.1 Destination Controller Command (Dual Controller System)
      2. 2.5.2 Memory Read/Write Command
        1. 2.5.2.1 Valid Memory Address Ranges
      3. 2.5.3 Debug Mask Command
  5. 3DLPC900 Fault Status
    1. 3.1 DLPC900 FAULT_STATUS Locations
    2. 3.2 DLPC900 FAULT_STATUS Interpretation
  6. 4Power-Up and Power-Down and Initialization Considerations
    1. 4.1 Power-Up
    2. 4.2 Power-Down
    3. 4.3 Power-Up Auto-Initialization
  7. 5Command Examples
    1. 5.1 Video Pattern Mode Example
    2. 5.2 Pre-Stored Pattern Mode Example
    3. 5.3 Pattern On-The-Fly Example
    4. 5.4 I2C Pass Through Write Example
    5. 5.5 I2C Pass Through Read Example
  8.   A Register Quick Reference
    1.     A.1 I2C Register Quick Reference
    2.     A.2 Command Guide
  9.   B Batch File Command Descriptors
    1.     B.1 Command Descriptors
  10.   C Revision History

USB Transaction Sequence

The USB 1.1 HID protocol has the structure shown in Figure 1-4. The host must build a stream of bytes that consist of the Report ID, Header, and the payload. The following is a description of these three parts.

Report ID: The Report ID is always set to 0x0 and always the leading byte of all transfers.

Header: The header consists of four bytes.

1) Flag Byte: Shown in Figure 1-4 and described in the Read and Write examples in Section 1.2.2 and Section 1.2.3.

2) Sequence Byte: The sequence byte can be a rolling counter and is used primarily when the host wants a response from the DLPC900. The DLPC900 responds with the same sequence byte that the host sent. The host can then match the sequence byte from the command it sent with the sequence byte from the DLPC900 response.

3) Length: Two bytes in length, this denotes the number of data bytes in the Payload only.

Payload Bytes: The payload bytes consist of the USB command followed by the data that is associated with the command.
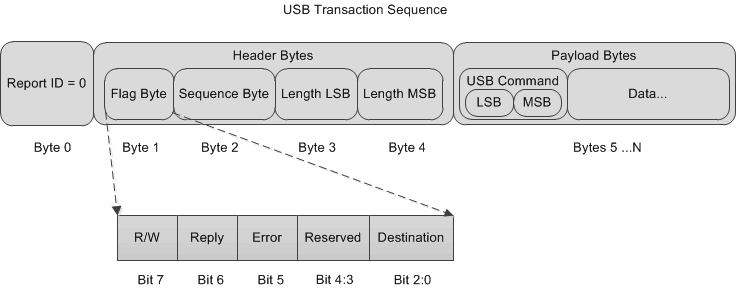
DLPC900 USB HID ProtocolFigure 1-4 USB HID Protocol

During a Write operation, the host transmits the entire transaction sequence to the DLPC900, and the DLPC900 performs the operation associated with the Write command. During a Read operation, the host transmits the entire transaction sequence to the DLPC900, and the DLPC900 performs the operation associated with the Read command. Therefore, both Write and Read transactions are considered writes to the DLPC900 where the host performs an API level Writefile to the HID driver. The difference is when the DLPC900 executes a Read operation, where the DLPC900 places the response into its internal buffer and waits for the host to perform an API level Readfile to the HID driver and only then does the DLPC900 transmit the response data back to the host.

The DLPC900 internal command buffer has a maximum of 512 bytes and it is shared between both the Write and Read operations; therefore, whenever the host performs a Read operation, it must be followed by the Readfile to the HID driver to get the response otherwise the response data is overwritten by the next Write or Read operation.

The HID protocol is limited to 64 byte transfers in both directions. Therefore, commands that are larger than 64 bytes require multiple transfers. Whenever such a command is used, only the very first transfer requires the Header and the USB Command. The Report ID is always the leading byte of all transfers. Figure 1-5 shows an example of a Write command that contains 76 bytes and requires two transfers. Notice that the first transfer contains 65 bytes, which is correct. The host hardware level HID driver extracts the Report ID before transmitting or receiving the data over the USB bus.
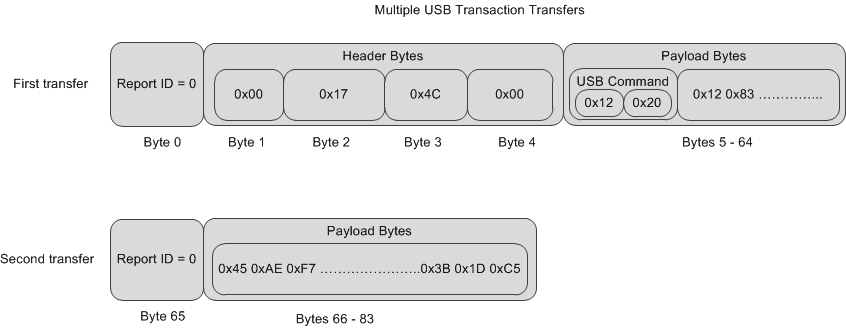
DLPC900 USB Multi-Transfer TransactionFigure 1-5 USB Multi-Transfer Transaction