DLPU102C December 2020 – July 2024
- 1
- Trademarks
- 1Read This First
- 2DLP LightCrafter Dual DLPC900 EVM Overview
- 3Quick Start
-
4Operating the DLP LightCrafter Dual DLPC900 EVM
- 4.1 DLP LightCrafter Dual DLPC900 Control Software
- 4.2 PC Software
- 4.3 System Common Controls
- 4.4 System Settings
- 4.5 Video Mode
- 4.6
Pattern Modes
- 4.6.1 Menu Bar
- 4.6.2 Creating a Pattern Sequence in Pattern On-The-Fly Mode
- 4.6.3 Creating a Pattern Sequence in Pre-Stored Pattern Mode
- 4.6.4 Reordering a Pattern Sequence using the Edit LUT Feature
- 4.6.5 Creating a Pattern Sequence in Video Pattern Mode
- 4.6.6 Creating a Pattern Sequence With DMD Block Load
- 4.6.7 Pattern Settings
- 4.7 Batch Files
- 4.8 Peripherals Panel
- 4.9 Firmware
- 4.10 Reprogram Controller Board for a Different Supported DMD
- 4.11 Flash Device Parameters
- 4.12 JTAG Flash Programming
- 4.13 Programming an EDID
- 4.14 Intel (Altera) FPGA Programming
- 5Connectors
- 6Power Supply Requirements
- 7Safety
- 8Revision History
4.7.2.1 Creating and Saving a Batch File Using the GUI
This example contains the following set of commands:
- Set the short axis image orientation.
- Set the input channel swap to ABC->CBA.
- Set the LED currents.
Follow these steps to add the commands and save to a text file
- Power-up the EVM and verify that the Connected radio button is lit green.
- Click the Video Mode button at the top of the GUI .
- Select the Parallel RGB under Source Select.
- Select Video Mode from the Operating Mode group box, and then select the HDMI radio-button from the IT6535 Receiver group box and finally click the Set button. (Select the DisplayPort radio-button if using this input connector).
- Verify the EVM is displaying the input source correctly. If no video source is displayed, then make sure the PC or host is supplying the correct resolution and frame rate. See Section 4.5.1 for video support.
- Click the Batch Files button at the top of the GUI.
- Check the Enable Command Logging box to enable logging.
- Click the Clear All button to clear the contents of the list box.
- Click the System Settings button at the top of the GUI.
- Click the Get button within the Image Orientation group box.
- Check the North/South checkbox and click the Set button within the group box. The image orientation of the displayed image is flipped on the short axis.
- Click the Video Mode button at the top of the GUI.
- Select ABC->CBA from the drop-down list box within the Input Port Data Swap group box.
- Click the Set button within the box. The colors of the image are adjusted for the setting.
- Click the System Settings button at the top of the GUI.
- Click the Get button within the LED Controls group box.
- Enter 100 for each of the LEDs within the LED Current group box and click the Set button. The LED brightness can change after setting the LED current.
- Click the Batch Files button at the top of the GUI.
- Within the list box, all the commands that were applied on previous steps are listed.
- Click the Save Batch File button to save as text file.
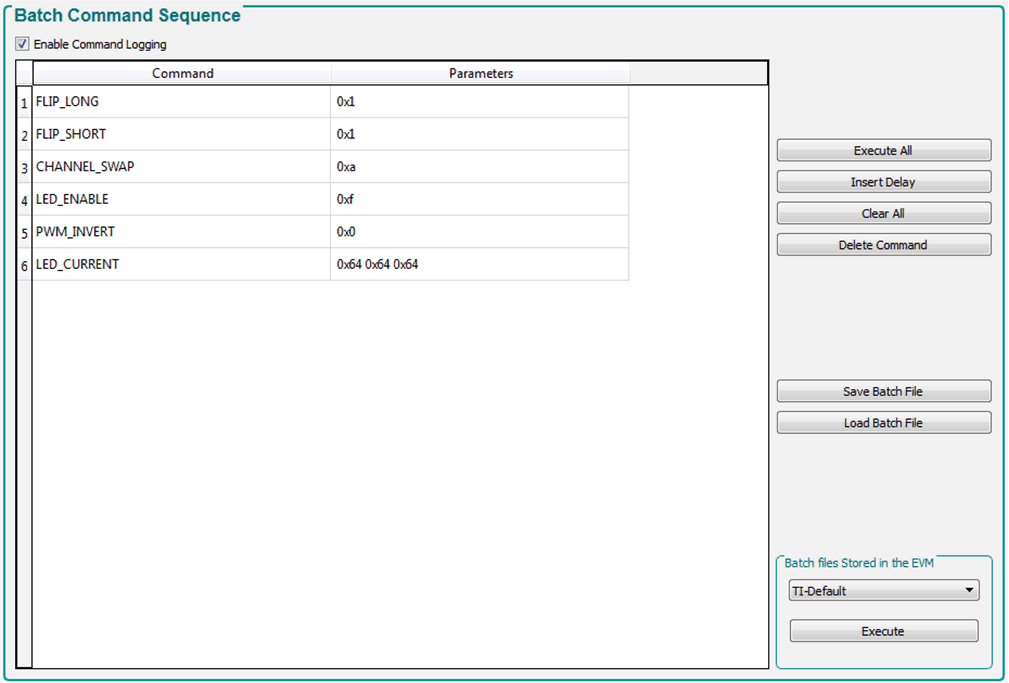
Figure 4-18 shows the contents of the list box. Notice that there are more than the three mentioned commands in the list box because when clicking the Set button for some commands in the GUI, multiple commands are combined. For example, when clicking the Set button for image orientation, both long and short axis commands are included.
Within the Batch File panel, each command can also be deleted or a delay can be inserted between commands.
 Figure 4-18 Batch File Example