SBAU398 March   2022


  1.   Trademarks
  2. 1Introduction
  3. 2Hardware Overview
    1. 2.1 AC-MB Settings
      1. 2.1.1 Audio Serial Interface Settings
        1. 2.1.1.1 USB
        2. 2.1.1.2 Optical or Auxilary Analog Audio Input
        3. 2.1.1.3 External
      2. 2.1.2 AC-MB Power Supply
    2. 2.2 ADCx120Q1EVM-PDK Hardware Settings
      1. 2.2.1 Line Inputs
      2. 2.2.2 Onboard Microphone Configuration
      3. 2.2.3 External Microphone Configurations
  4. 3Software Overview
    1. 3.1 PurePath Console 3 Installation
    2. 3.2 ADCx120Q1EVM GUI Installation
      1. 3.2.1 Software Setup
  5. 4GPIO1 Settings
  6. 5Master Mode Operation
  7. 6Quick Start
    1. 6.1 Configuring the Audio Serial Bus for the I2S Output
    2. 6.2 Saving a Configuration
  8. 7Schematic and Bill of Materials
    1. 7.1 ADCx120Q1EVM-PDK Schematic and Bill of Materials
      1. 7.1.1 ADCx120Q1EVM-PDK Schematic
      2. 7.1.2 ADCx120Q1EVM-PDK Bill of Materials
    2. 7.2 AC-MB Schematic and Bill of Materials
      1. 7.2.1 AC-MB Schematic
      2. 7.2.2 AC-MB Bill of Materials
    3. 7.3 Matlab Audio Capture Example

Onboard Microphone Configuration

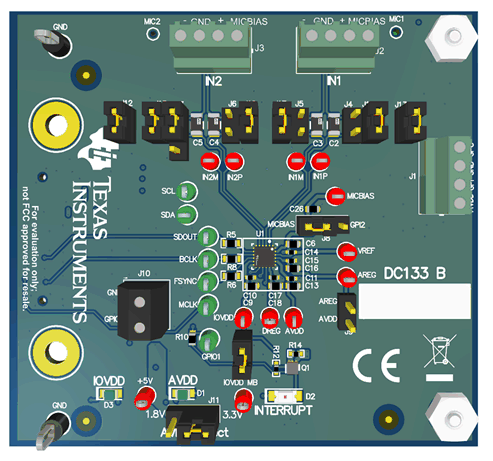
The ADCx120Q1EVM-PDK comes equipped with 2 onboard microphones: 1x ICS-40740 analog microphone and 1x T5818 digital microphone. The ICS-40740 can be connected to IN1 and the T5818 can be connected to IN2 with onboard shunts using the jumper settings shown in Table 2-1 and Figure 2-9. MICBIAS is used to power the ICS-40740, so header J8 must be set to MICBIAS. There must not be any connections to J2 or J3 during onboard microphone use to preserve the performance of the microphones. The PCMD3140Q1EVM-PDK only includes the T5818 digital microphone, but the same script in Table 2-1 and Figure 2-9 can be used for configuring the microphone.
Table 2-1 Onboard Mic Jumper Configuration
JumperSetting
J13Short
J16Short
J17Short
J12Short
J15Short
J19 Short
J4Open
J5Open
J6Open
J7Open
J8Pins 1-2; MICBIAS
J9

Open (if 3.3V AVDD is used)

Short (if 1.8V AVDD is used)

J10Open
J11

Pins 1-2: AVDD = 3.3V

Pines 2-3: AVDD = 1/8V

J14Short
GUID-10ACE657-5959-44AF-AACF-911E9511FD87-low.gifFigure 2-9 Onboard Mic Jumpers

To configure the ADC for both onboard microphones, use the Onboard Microphones preset in the PPC3 GUI, or copy and paste the following script in I2C master app:

#####On-Board MIC Config######

w 9c 02 81 #Wake up device and enable AREG

w 9c 01 01 #Software Reset

d 100 #Wait 100ms

w 9c 00 00 #Set page 0

w 9c 02 81 #Wake up device and enable AREG

d 10 #wait 10 ms

w 9c 0d 01 #Set Ch-3 data to ASI left slot 1

w 9c 22 41 #Set IN2M_GPO1 to PDCMLK output (Default 3.072MHz)

w 9c 2b 50 #Set IN2P_GPI1 to PDMDIN2 for channel 3 and 4

w 9c 73 A0 #Enable input Ch-1 and Ch-3

w 9c 74 A0 # Enable ASI Output Ch-1 and Ch-3 slots

w 9c 75 E0 # Power-up ADC, MICBIAS and PLL