SBOU157 September 2015 OPT8241
- Voxel Viewer
4.8 Profiles and Calibration
Voxel Viewer comes with 5 built-in operating profiles:
- Lens Only
- Short Range
- Long Range
- High Ambient
- No Calibration
Typical calibration procedure involves creating several hardware profiles that are stored on the camera. These typically consist of:
LensOnlyHW – starts with Lens Only profile; inherits from Lens Only, calibrates for lens distortion.
LongRangeHW – starts with Long Range profile, inherits from LensOnlyHW; calibrates for frequency, temperature, common phase, and pixel-wise variations.
ShortRangeHW – starts with Short Range profile; inherits from LongRangeHW; calibrates for common phase only.
HiAmbientHW – starts with High Ambient profile; inherits from LongRangeHW; calibrates from common phase only.
Note that a profile can inherit the calibration results from another profile. This turned out to be an efficient mechanism of saving EEPROM space. The calibration detail is described in the following four steps:
Step 1: Create LensOnlyHW Profile
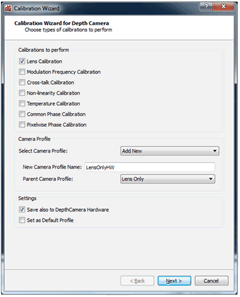
With the current operating profile set at Lens Only (Settings → Camera Profiles → Lens Only), bring up the Calibration Wizard (Settings → Edit Profiles), check the Lens Calibration checkbox, uncheck all the other boxes. Enter a new profile name, “LensOnlyHW” with Parent Camera Profile set to Lens Only. Check Save also to DepthCamera Hardware if you want to save the calibration parameters to the EEPROM. Click Next and follow the instruction listed in Section 4.1. The calibration distance should be far enough to see the entire checkerboard pattern (A2 format), yet close enough to fill the image as much as possible. When this step is done, two new profiles will be added: LensOnlyHW is the local cached copy of the lens calibration, and LensOnlyHW (HW) is the one stored onboard the camera.
 Figure 36. LensOnlyHW Profile Settings
 Step 2: Create LongRangeHW Profile
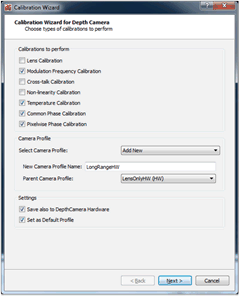
With the current operating profile set at Long Range (Settings → Camera Profiles → Long Range), bring up the Calibration Wizard (Settings → Edit Profiles), configure the checkboxes as in Figure 37. The profile to save to is “LongRangeHW”. This profile inherits the lens calibration from the LensOnlyHW (HW) profile, and has several other calibration types included.
 Figure 37. LongRangeHW Profile Settings
 Click Next, and each of the checked calibration steps will be executed in sequence. The detail of each calibration step can be found in Section 4.2, Section 4.5, Section 4.6, and Section 4.7. After the entire sequence is completed, two more profiles will be created: LongRangeHW, which is the local cache, and LongRangeHW (HW), which is stored on the camera. As one will see later, the LongRangeHW (HW) profile will be the parent profile for several other profiles. The LongRangeHW is also set as the default profile.
Step 3: Create ShortRangeHW Profile
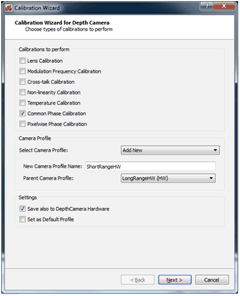
With the current operating profile set at Short Range (Settings → Camera Profiles → Short Range), bring up the Calibration Wizard (Settings->Edit Profiles), configure the checkboxes as in Figure 38. The profile to save to is “ShortRangeHW”. This profile inherits from the LongRangeHW (HW) profile, and has only the Common Phase Calibration included, because ShortRangeHW and ShortRangeHW (HW) will inherit the results of other calibration types from the LongRangeHW (HW) profile. Click Next and proceed with the Common Phase Calibration described in Section 4.6. When this step is completed, two more profiles, ShortRangeHW and ShortRangeHW (HW) will be created.
 Figure 38. ShortRangeHW Profile Settings
 Step 4: Create HiAmbientHW Profile
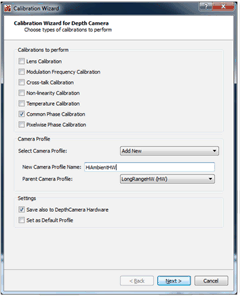
With the current operating profile set at High Ambient (Settings → Camera Profiles → High Ambient), bring up the Calibration Wizard (Settings → Edit Profiles), configure the checkboxes as in Figure 39. The profile to save to is “HiAmbientHW”. This profile also inherits from the LongRangeHW (HW). Click Next and proceed with Common Phase Calibration as before. When this step is completed, HiAmbientHW and HiAmbientHW (HW) profiles are created.
 Figure 39. High Ambient Profile Settings