SLAU936 August 2024 TAS2120
- 1
- Description
- Get Started
- Features
- Applications
- 6
- 1Evaluation Module Overview
- 2Quick Start Guide
-
3Hardware
- 3.1 AC-MB Settings
- 3.2 AC-MB Power Supply
- 3.3 Default Jumper Setting on TAS2120EVM
- 3.4 I2C Target Address Selection
- 3.5 IOVDD Power Supply Options
- 3.6 AVDD Power Supply Options
- 3.7 VBAT Power Supply Options
- 3.8 IOVDD_BUFF Power Supply Options
- 3.9 Speaker Outputs
- 3.10 2-Channel Configuration
- 3.11 4-Wire Measurement of Load
- 4Hardware Design Files
- 5Additional Information
3.11 4-Wire Measurement of Load
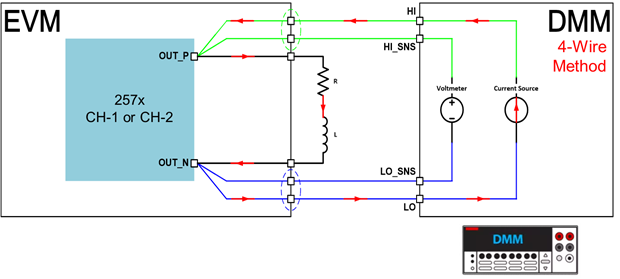
TAS2120EVM has been designed such that the dummy load or speaker load connected to the device can be measured very accurately directly from the device pin including board parasitic and connector contact resistance using 4-wire method in digital multimeter. Pin header have been provided to be able to connect digital multimeter in 4-wire mode as shown below Figure 3-9.
Connect HI of DMM to pin-1 and HI_SNS of DMM to pin-2 of TP19 test point.
Connect LO of DMM to pin-2 and LO_SNS of DMM to pin-1 of TP20 test point.
 Figure 3-9 Load DC Resistance Measurement in 4-Wire Mode using Digital Multimeter