SLOU560 July 2022 TAS2781
5 Mono Setup Quick Start
Use the following instructions to complete a mono setup using TAS2781EVM:
- Install PPC3 with the TAS2781 plug-in.
- Connect a speaker to J6.
- Connect a 3.5 V to 12 V supply to connector J20 or J21.
- Connect a Micro USB Cable from PC to TAS2781EVM.
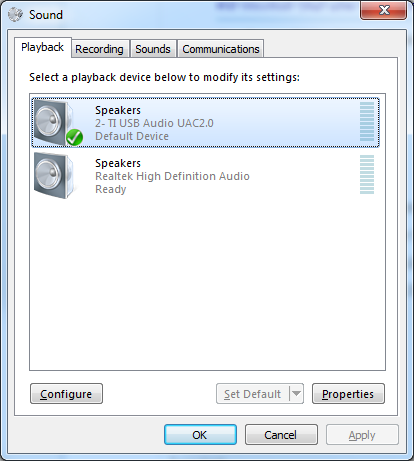
- Verify that TI USB Audio UAC2.0 is the default playback device by opening the sound dialog from the Windows Control Panel.
 Figure 5-1 Windows Playback Devices
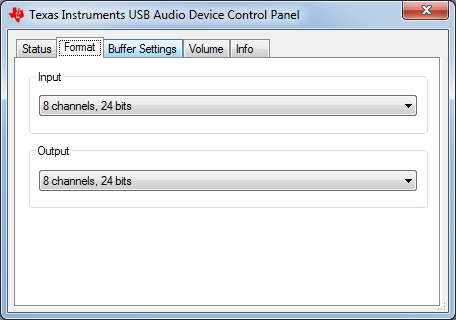
 - Set the maximum bit depth using the Texas Instruments USB Audio Device Control Panel found in the system tray.
 Figure 5-2 Texas Instruments USB Audio Device Control Panel
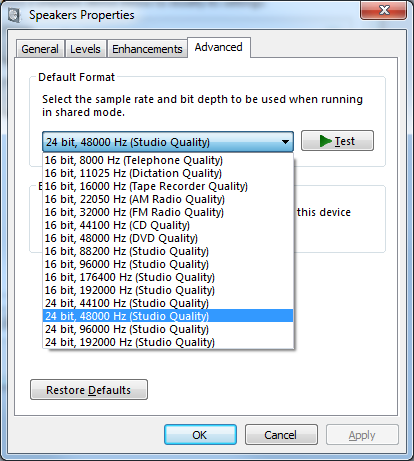
 - Set the sampling rate.
- Right click TI USB AUdio UAC2.0
- Select Properties
- Click advanced tab
- Select Rate
 Figure 5-3 Windows Playback device Sample Rate
- Open PPC3 and TAS2781 EVM plug in.
Select Mono is speaker configuration window.
Click Start button in top right corner.
- Connect to EVM by clicking on the lower-left corner button.
- Open Device Control panel from TAS2781 EVM Home.
Select ROM Mode from drop down menu.
Click Apply button to initialize the device to default settings.
At this point the device is ready to play audio content through USB, for example, any sound card.