SPMA080 April 2021 TM4C1292NCPDT , TM4C1292NCPDT , TM4C1292NCZAD , TM4C1292NCZAD , TM4C1294KCPDT , TM4C1294KCPDT , TM4C1294NCPDT , TM4C1294NCPDT , TM4C1294NCZAD , TM4C1294NCZAD , TM4C1299KCZAD , TM4C1299KCZAD , TM4C1299NCZAD , TM4C1299NCZAD , TM4C129DNCPDT , TM4C129DNCPDT , TM4C129DNCZAD , TM4C129DNCZAD , TM4C129EKCPDT , TM4C129EKCPDT , TM4C129ENCPDT , TM4C129ENCPDT , TM4C129ENCZAD , TM4C129ENCZAD , TM4C129LNCZAD , TM4C129LNCZAD , TM4C129XKCZAD , TM4C129XKCZAD , TM4C129XNCZAD , TM4C129XNCZAD
- Trademarks
- 1 Introduction
- 2 Application Examples
- 3 Application Setup
- 4 Download and Import the Ethernet Examples
- 5 How to Create an Ethernet Application for TI-RTOS NDK
- 6 Enet_tcpecho_server_tirtos Example Overview
- 7 Enet_udpecho_server_tirtos Example Overview
- 8 Enet_httpServer_tirtos Example Overview
- 9 Enet_dns_tirtos Example Overview
- 10Enet_sntp_tirtos Example Overview
- 11Enet_tcpecho_client_tirtos Example Overview
- 12Enet_udpecho_client_tirtos Example Overview
- 13Enet_httpget_tirtos Example Overview
- 14References
6.3 Run the enet_tcpecho_server_tirtos Example
Connect the EK-TM4C1294XL LaunchPad to either the Ethernet switch or the router with an Ethernet cable as shown in Figure 3-1. Run the example. With the CCS console window opened, you should see the IP address (pointed by arrow) displayed and the server is ready as shown in Figure 6-5. Record the IP address as you will need this information on the client side. Initially the server will be in a listening state waiting for the client to connect to it. Therefore, to continue the rest of the example, a remote client needs to be setup.
 Figure 6-5 Enet_tcpecho_server_tirtos
Output
Figure 6-5 Enet_tcpecho_server_tirtos
OutputUse the SocketTest tool that will act as the client running on the PC. Make sure the PC is connected to the same network as the EK-TM4C1294XL with the same subnet mask.
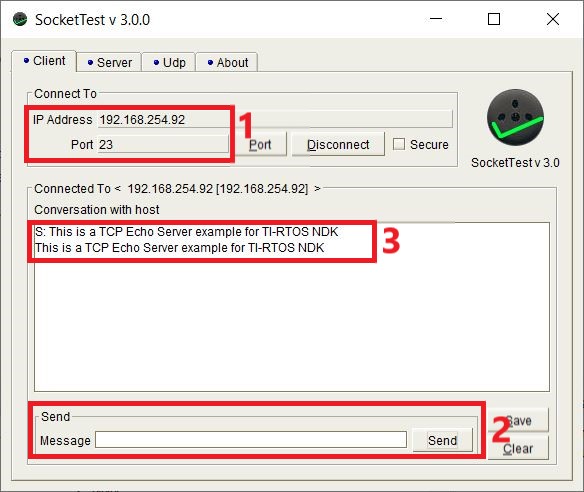
Follow the steps shown in Figure 6-6 to setup the client:
- Open SocketTest and enter the server IP address as well as the port number 23. Port 23 is the default Telnet port number in TCP and UDP protocols. Finally, press the “Connect” button. In a short while the connection with the server will be established and you are ready for a conversation with the server.
- Go to the “Message” field and type in some messages and then hit the “Send” button.
- The message you enter will be displayed in the conversation field. When the server receives the message, it will echo back the message to the client.
 Figure 6-6 SocketTest Client Configuration
for Enet_tcpecho_server_tirtos
 Examine the message “This is a TCP Echo Server example for TI-RTOS NDK” that was sent by the client to the server. If you count manually, this message has a total length of 51 bytes including the two \n\r escape characters. The \n is the New Line and \r is the Carriage Return character in the ASCII table.
As can be seen in the conversation field, the server echoes back the exact message.
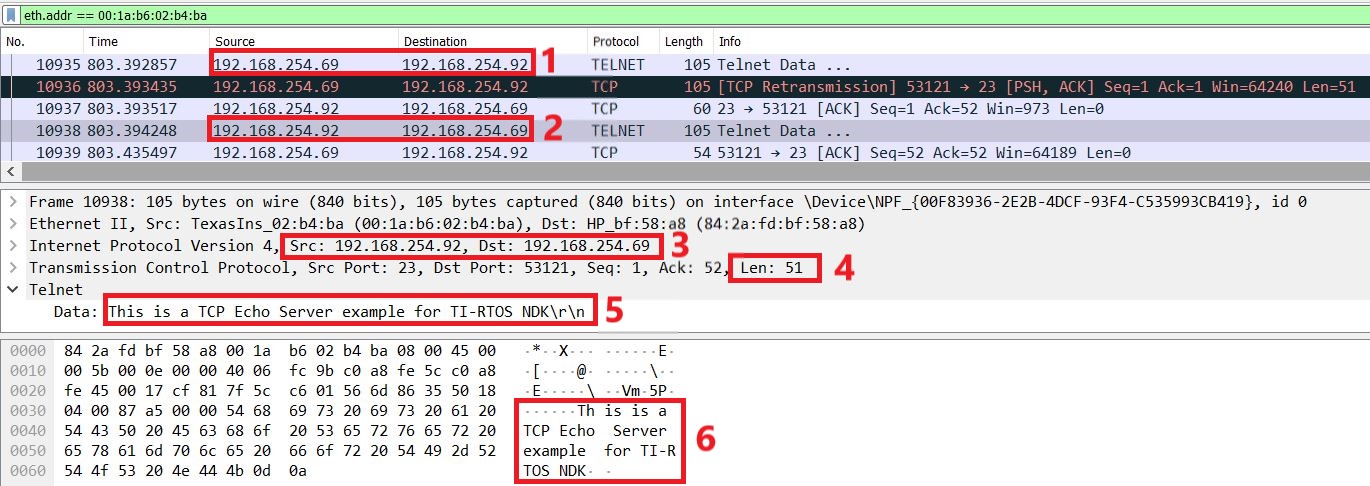
Also, examine the Wireshark capture in Figure 6-7 for the Ethernet traffic.
- The client (IP Address 192.168.254.69) sends the message to the server (IP Address 192.168.254.92). For more information, see Figure 6-5 on the IP Address acquired for the server.
- The server (IP Address 192.168.254.92) echoes back the message to the client (IP Address 192.168.254.69).
- In Wireshark when you click on any row, it will expand with transaction details. Click the frame number 10938 to show the detail pertaining to the echoed message.
- As you can see the length of the echoed message by the server is indeed 51 which is the same as what was sent by the client.
- The message content echoed by the server is displayed including the two \r\n escape characters.
 Figure 6-7 Server to Client Wireshark Capture
for Enet_tcpecho_server_tirtos