SPMU373A March 2021 – August 2022 TM4C1230C3PM , TM4C1230D5PM , TM4C1230E6PM , TM4C1230H6PM , TM4C1231C3PM , TM4C1231D5PM , TM4C1231D5PZ , TM4C1231E6PM , TM4C1231E6PZ , TM4C1231H6PGE , TM4C1231H6PM , TM4C1231H6PZ , TM4C1232C3PM , TM4C1232D5PM , TM4C1232E6PM , TM4C1232H6PM , TM4C1233C3PM , TM4C1233D5PM , TM4C1233D5PZ , TM4C1233E6PM , TM4C1233E6PZ , TM4C1233H6PGE , TM4C1233H6PM , TM4C1233H6PZ , TM4C1236D5PM , TM4C1236E6PM , TM4C1236H6PM , TM4C1237D5PM , TM4C1237D5PZ , TM4C1237E6PM , TM4C1237E6PZ , TM4C1237H6PGE , TM4C1237H6PM , TM4C1237H6PZ , TM4C123AE6PM , TM4C123AH6PM , TM4C123BE6PM , TM4C123BE6PZ , TM4C123BH6PGE , TM4C123BH6PM , TM4C123BH6PZ , TM4C123BH6ZRB , TM4C123FE6PM , TM4C123FH6PM , TM4C123GE6PM , TM4C123GE6PZ , TM4C123GH6PGE , TM4C123GH6PM , TM4C123GH6PZ , TM4C123GH6ZRB , TM4C123GH6ZXR , TM4C1290NCPDT , TM4C1290NCZAD , TM4C1292NCPDT , TM4C1292NCZAD , TM4C1294KCPDT , TM4C1294NCPDT , TM4C1294NCZAD , TM4C1297NCZAD , TM4C1299KCZAD , TM4C1299NCZAD , TM4C129CNCPDT , TM4C129CNCZAD , TM4C129DNCPDT , TM4C129DNCZAD , TM4C129EKCPDT , TM4C129ENCPDT , TM4C129ENCZAD , TM4C129LNCZAD , TM4C129XKCZAD , TM4C129XNCZAD
- Read This First
- 1Introduction to TivaWare SDK
- 2TivaWare Example Projects
- 3Linking Files and Libraries into a TivaWare Project in Code Composer Studio
- 4How to Debug a TivaWare Library
- 5How to Add TivaWare to an Existing CCS Project
- 6TivaWare Boot Loader
- 7Software Best Practices
- 8TM4C Resources
- 9Revision History
6.2 How to Boot Load with LM Flash Programmer
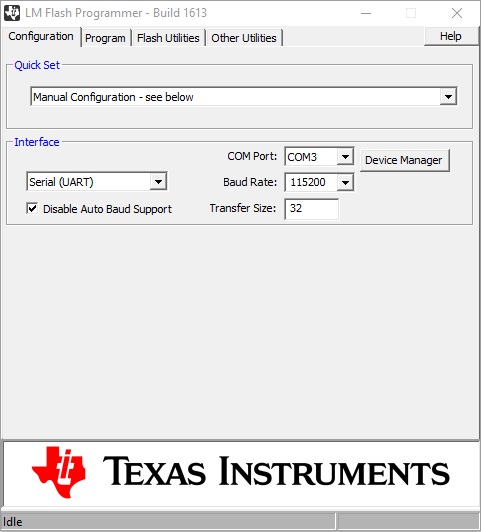
The TI offered LM Flash Programmer utility tool enables boot loading for TM4C devices over UART, USB, and Ethernet interfaces. In order to use the tool for boot loading, select the Manual Configuration option in the Quick Set section of the Configuration tab (Figure 7-1). After Manual Configuration is selected, then the Interface section can be used to select one of the three boot loading options of Serial (UART), Ethernet, and USB DFU.
 Figure 6-1 LM Flash Programmer Manual
Configuration
For the Ethernet boot loader, it is important to ensure the correct Client MAC Address is entered. When using the USB DFU mode, the TM4C microcontroller must be in a state where the USB boot loader is running so that the PC can recognize the USB DFU port. If no devices show up on the list, invoke the USB boot loader on the TM4C microcontroller and then use the refresh button to trigger LM Flash Programmer to search for the USB DFU interface again.
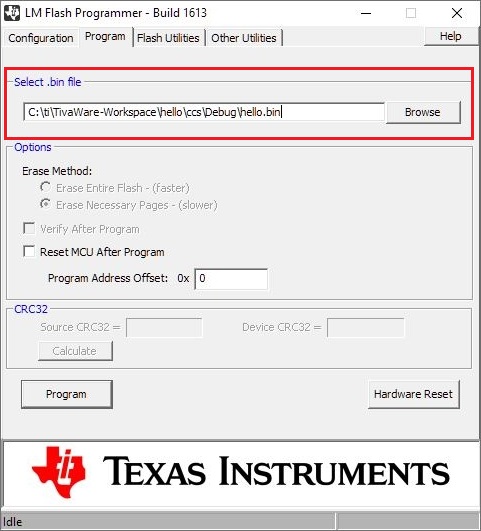
Once the desired interface is setup, move to the Program tab to select the binary file for programming. Browse the local file system to find the .bin file for your project (Figure 7-2). This will always be located in the Debug folder of a CCS project.
 Figure 6-2 Browse for .bin File
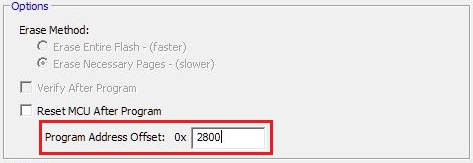
Once the file is selected, set the correct Program Address Offset (Figure 7-3). This will be equal to the APP_START_ADDRESS. Once these steps are completed, press the Program button to trigger the boot loading process and upload the application firmware onto the device.
 Figure 6-3 Set the Program Address Offset
Value