SPRACA7A October 2017 – September 2022 TMS320F28075 , TMS320F28075-Q1 , TMS320F28374D , TMS320F28374S , TMS320F28375D , TMS320F28375S , TMS320F28375S-Q1 , TMS320F28376D , TMS320F28376S , TMS320F28377D , TMS320F28377D-EP , TMS320F28377D-Q1 , TMS320F28377S , TMS320F28377S-Q1 , TMS320F28379D , TMS320F28379D-Q1 , TMS320F28379S
2.1.2.1 Executing HWBIST Micro-Run
To execute one micro-run of the HWBIST after the semaphore has been claimed by the CPU core under test and a one-time initialization has been performed, you must call the following function:
STL_HWBIST_runMicro();This function performs an HWBIST micro-run of the CPU under test and returns the status of the micro-run. This function is designed to be used as a periodic self-test (PEST).
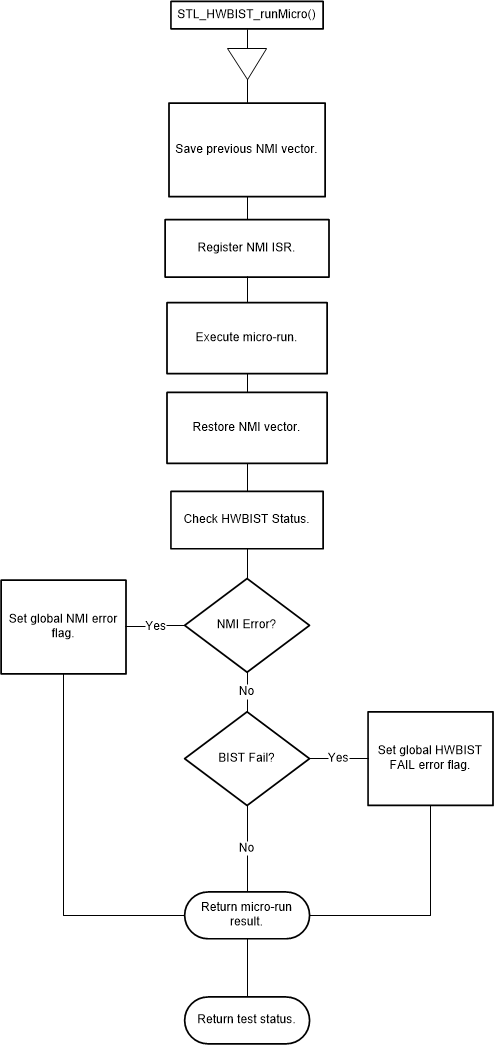
Figure 2-1 shows a flow chart detailing the design of the STL_HWBIST_runMicro() function. This information is also available in the Diagnostic Library User's Guide.
 Figure 2-1 STL_HWBIST_runMicro() Flow
Chart
Figure 2-1 STL_HWBIST_runMicro() Flow
ChartTo perform a full HWBIST for a coverage level less than or equal to 95% using the STL_HWBIST_runMicro() function, the following sequence of functions must be executed:
- If on a multi-core device, claim
the HWBIST semaphore.
STL_HWBIST_claimSemaphore(); - Initialize the HWBIST for 95%
coverage or less depending on the options available on your
device.
STL_HWBIST_init(STL_HWBIST_95_LOS); - Execute a HWBIST micro-run.
STL_HWBIST_runMicro(); - Repeat Step 3 until complete or an error is observed. Execute STL_HWBIST_runMicro() until it is complete with no error, or until an error is observed through the return value, a global error flag is set, or an NMI is triggered. Keep track of the number of times that STL_HWBIST_runMicro() is called. If after the expected number of micro-runs for your coverage level the return value still does not indicate that HWBIST is complete, consider it a time out error. The number of micro-runs is defined in the code as STL_HWBIST_MICRO_LIMIT_<coverage> in stl_hwbist.h. For example, on the F28002x STL_HWBIST_MICRO_LIMIT_90 is set to 750, meaning to reach 90% diagnostic coverage the application needs to call STL_HWBIST_runMicro() 750 times.
- If on a multi-core device,
release the HWBIST
semaphore.
STL_HWBIST_releaseSemaphore();
To perform a full HWBIST with 99% coverage (only supported on F2837x, F2807x, and F2838x devices) using the STL_HWBIST_runMicro() function, you typically follow the steps above to reach 95%, reinitialize HWBIST for 99% coverage, and then repeatedly call STL_HWBIST_runMicro() until it completes or an error is found. These steps vary slightly from device to device. For more details, see the device-specific SDL User's Guide.
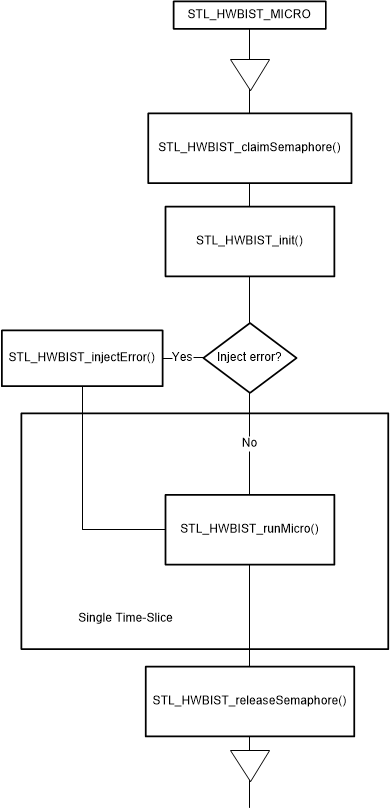
Figure 2-2 shows a flow chart of the setup and execution of a single time-sliced micro-run.
 Figure 2-2 Flow Chart of Time-Sliced
Micro-Run Execution