TIDUF60 December   2023


  1.   1
  2.   Description
  3.   Resources
  4.   Features
  5.   Applications
  6.   6
  7. 1System Description
    1. 1.1 Terminology
    2. 1.2 Key System Specifications
  8. 2System Overview
    1. 2.1 Block Diagram
    2. 2.2 Design Considerations
    3. 2.3 Highlighted Products
      1. 2.3.1 TMS320F2800137
      2. 2.3.2 MSPM0G1507
      3. 2.3.3 TMP6131
      4. 2.3.4 UCC28881
      5. 2.3.5 TPS54202
      6. 2.3.6 TLV9062
      7. 2.3.7 TLV74033
    4. 2.4 System Design Theory
      1. 2.4.1 Hardware Design
        1. 2.4.1.1 Modular Design
        2. 2.4.1.2 High-Voltage Buck Auxiliary Power Supply
        3. 2.4.1.3 DC Link Voltage Sensing
        4. 2.4.1.4 Motor Phase Voltage Sensing
        5. 2.4.1.5 Motor Phase Current Sensing
        6. 2.4.1.6 External Overcurrent Protection
        7. 2.4.1.7 Internal Overcurrent Protection for TMS320F2800F137
      2. 2.4.2 Three-Phase PMSM Drive
        1. 2.4.2.1 Field-Oriented Control of PM Synchronous Motor
          1. 2.4.2.1.1 Space Vector Definition and Projection
            1. 2.4.2.1.1.1 ( a ,   b ) ⇒ ( α , β ) Clarke Transformation
            2. 2.4.2.1.1.2 α , β ⇒ ( d ,   q ) Park Transformation
          2. 2.4.2.1.2 Basic Scheme of FOC for AC Motor
          3. 2.4.2.1.3 Rotor Flux Position
        2. 2.4.2.2 Sensorless Control of PM Synchronous Motor
          1. 2.4.2.2.1 Enhanced Sliding Mode Observer With Phase-Locked Loop
            1. 2.4.2.2.1.1 Mathematical Model and FOC Structure of an IPMSM
            2. 2.4.2.2.1.2 Design of ESMO for the IPMSM
            3. 2.4.2.2.1.3 Rotor Position and Speed Estimation With PLL
        3. 2.4.2.3 Field Weakening (FW) and Maximum Torque Per Ampere (MTPA) Control
        4. 2.4.2.4 Hardware Prerequisites for Motor Drive
          1. 2.4.2.4.1 Motor Current Feedback
            1. 2.4.2.4.1.1 Three-Shunt Current Sensing
            2. 2.4.2.4.1.2 Single-Shunt Current Sensing
          2. 2.4.2.4.2 Motor Voltage Feedback
  9. 3Hardware, Software, Testing Requirements, and Test Results
    1. 3.1 Getting Started Hardware
      1. 3.1.1 Hardware Board Overview
      2. 3.1.2 Test Conditions
      3. 3.1.3 Test Equipment Required for Board Validation
    2. 3.2 Getting Started GUI
      1. 3.2.1 Test Setup
      2. 3.2.2 Overview of GUI Software
      3. 3.2.3 Setup Serial Port
      4. 3.2.4 Motor Identification
      5. 3.2.5 Spin Motor
      6. 3.2.6 Motor Fault Status
      7. 3.2.7 Tune Control Parameters
      8. 3.2.8 Virtual Oscilloscope
    3. 3.3 Getting Started C2000 Firmware
      1. 3.3.1 Download and Install Software Required for Board Test
      2. 3.3.2 Opening Project Inside CCS
      3. 3.3.3 Project Structure
      4. 3.3.4 Test Procedure
        1. 3.3.4.1 Build Level 1: CPU and Board Setup
          1. 3.3.4.1.1 Start CCS and Open Project
          2. 3.3.4.1.2 Build and Load Project
          3. 3.3.4.1.3 Setup Debug Environment Windows
          4. 3.3.4.1.4 Run the Code
        2. 3.3.4.2 Build Level 2: Open-Loop Check With ADC Feedback
          1. 3.3.4.2.1 Start CCS and Open Project
          2. 3.3.4.2.2 Build and Load Project
          3. 3.3.4.2.3 Setup Debug Environment Windows
          4. 3.3.4.2.4 Run the Code
        3. 3.3.4.3 Build Level 3: Closed Current Loop Check
          1. 3.3.4.3.1 Start CCS and Open Project
          2. 3.3.4.3.2 Build and Load Project
          3. 3.3.4.3.3 Setup Debug Environment Windows
          4. 3.3.4.3.4 Run the Code
        4. 3.3.4.4 Build Level 4: Full Motor Drive Control
          1. 3.3.4.4.1 Start CCS and Open Project
          2. 3.3.4.4.2 Build and Load Project
          3. 3.3.4.4.3 Setup Debug Environment Windows
          4. 3.3.4.4.4 Run the Code
          5. 3.3.4.4.5 Tuning Motor Drive FOC Parameters
          6. 3.3.4.4.6 Tuning Field Weakening and MTPA Control Parameters
          7. 3.3.4.4.7 Tuning Current Sensing Parameters
    4. 3.4 Test Results
      1. 3.4.1 Load and Thermal Test
      2. 3.4.2 Overcurrent Protection by External Comparator
      3. 3.4.3 Overcurrent Protection by Internal CMPSS
    5. 3.5 Migrate Firmware to a New Hardware Board
      1. 3.5.1 Configure the PWM, CMPSS, and ADC Modules
      2. 3.5.2 Setup Hardware Board Parameters
      3. 3.5.3 Configure Faults Protection Parameters
      4. 3.5.4 Setup Motor Electrical Parameters
    6. 3.6 Getting Started MSPM0 Firmware
  10. 4Design and Documentation Support
    1. 4.1 Design Files
      1. 4.1.1 Schematics
      2. 4.1.2 Bill of Materials
      3. 4.1.3 PCB Layout Recommendations
      4. 4.1.4 Altium Project
      5. 4.1.5 Gerber Files
    2. 4.2 Software Files
    3. 4.3 Documentation Support
    4. 4.4 Support Resources
    5. 4.5 Trademarks
  11. 5About the Author

Project Structure

Once the project is imported, the project explore appears inside CCS as shown in Figure 3-20. The device peripherals configuration is based on C2000Ware driverlib. The users only need to change the codes and definitions in hal.c and hal.h.

The folder src_control includes hal.c and user_mtr1.c, in which users can change codes and definitions.

The folder src_board includes board drivers for this hardware board.

The folder src_control includes motor drive files that call motor control core algorithm functions within the interrupt service routines and background tasks.
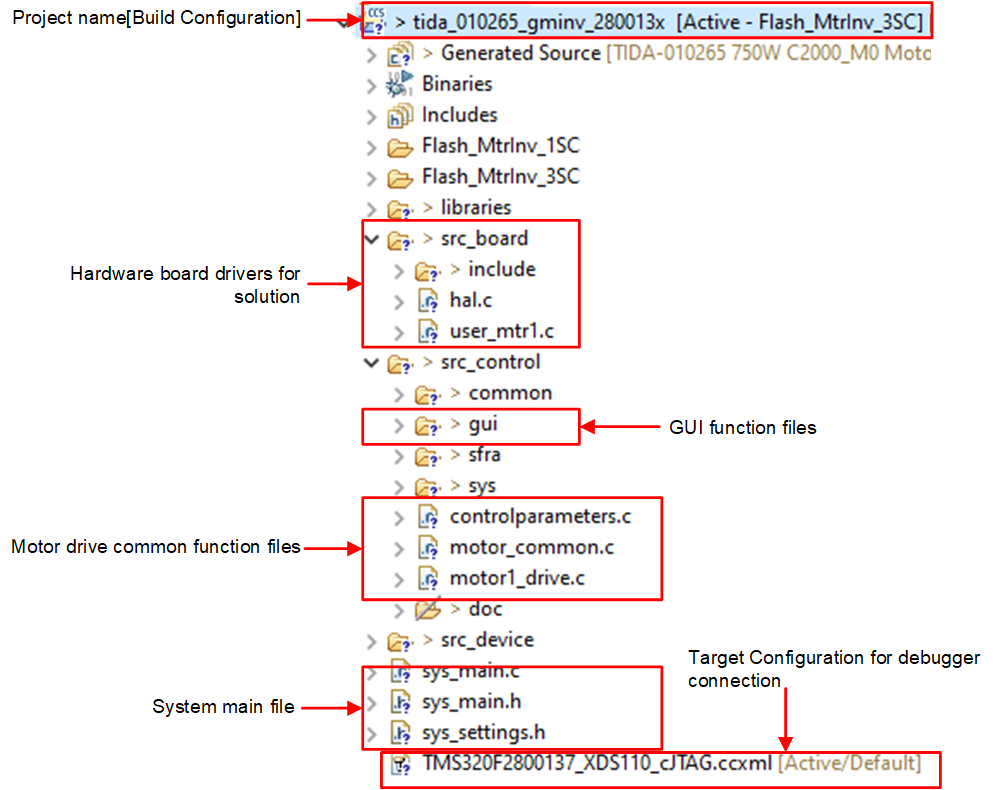
GUID-20231102-SS0I-XTH1-GN3N-PXWS05SS0201-low.pngFigure 3-20 TIDA-010265 Project Explorer View

Figure 3-21 shows the project software flow diagram of ISR for motor control, a main loop for motor control parameters update in background loop.

GUID-20231030-SS0I-V3LV-V58J-BMCN22MZQLLN-low.svgFigure 3-21 Firmware Project Flow Diagram

The project consists of a motor control interrupt service routine, which are called every PWM cycle. A few background tasks are called in a loop forever in main() and can be used to run slow tasks for which absolute timing accuracy is not required, motor control parameters update, and so on. A CPU timer is used to trigger slow background tasks.

motor1CtrlISR is reserved for calling the motor drive control algorithms to spin the motor 1 that is periodically triggered at USER_M1_ISR_FREQ_Hz.

To simplify the system, the bring up and design of the software for this reference design is organized in four labs with incremental builds (DMC_BUILDLEVEL), which makes learning and getting familiar with the board and software easier. This approach is also good for debugging and testing boards. Table 3-1 lists the detailed incremental build options. To select a particular build option, select the corresponding BUILDLEVEL option in sys_settings.h. Once the build option is selected, compile the project by selecting the rebuild all compiler option. Section 3.3.4 provides more details to run each of the build level options.

Table 3-1 Incremental Build Options
OPERATIONBUILD OPTIONDESCRIPTION
MOTOR DRIVEDMC_LEVEL_150% PWM duty, verify ADC offset calibration, PWM output and phase shift
DMC_LEVEL_2Open-loop v/f control to check current and voltage sensing signals for motor
DMC_LEVEL_3Closed current loop to check the hardware settings
DMC_LEVEL_4Motor parameters identify and run with InstaSPIN-FOC or eSMO