TIDUF60 December 2023
- 1
- Description
- Resources
- Features
- Applications
- 6
- 1System Description
-
2System Overview
- 2.1 Block Diagram
- 2.2 Design Considerations
- 2.3 Highlighted Products
- 2.4 System Design Theory
-
3Hardware, Software, Testing Requirements, and Test Results
- 3.1 Getting Started Hardware
- 3.2 Getting Started GUI
- 3.3
Getting Started C2000 Firmware
- 3.3.1 Download and Install Software Required for Board Test
- 3.3.2 Opening Project Inside CCS
- 3.3.3 Project Structure
- 3.3.4 Test Procedure
- 3.4 Test Results
- 3.5 Migrate Firmware to a New Hardware Board
- 3.6 Getting Started MSPM0 Firmware
- 4Design and Documentation Support
- 5About the Author
3.3.4.4.4 Run the Code
To run the code, complete the following steps:
- Set the AC source output to 0 V at 50/60 Hz, turn on the AC power supply, slowly increase the input voltage from 0-V to 220-V AC.
- The required motor parameters must be recorded in the header files (user_mtr1.h) as shown in the following example codes. If the motor parameters are not well known, the motor identification can be used to achieve the motor parameters if the FAST estimator is implemented in the reference design.
#define USER_MOTOR1_Rs_Ohm (2.68207002f) #define USER_MOTOR1_Ls_d_H (0.00926135667f) #define USER_MOTOR1_Ls_q_H (0.00926135667f) #define USER_MOTOR1_RATED_FLUX_VpHz (0.381890297f) - Change the userParams_M1.flag_bypassMotorId value to "false" to enable the motor identification as the following example code for motor.
// true->enable identification, false->disable identification userParams[MTR_1].flag_bypassMotorId = false; - Set the right identification variables value in the user_mtr1.h according to the specification of the motor.
#define USER_MOTOR1_RES_EST_CURRENT_A (1.0f) // A - 10~30% of rated current of the motor #define USER_MOTOR1_IND_EST_CURRENT_A (-1.0f) // A - 10~30% of rated current of the motor, just enough to enable rotation #define USER_MOTOR1_MAX_CURRENT_A (6.5f) // A - 30~150% of rated current of the motor #define USER_MOTOR1_FLUX_EXC_FREQ_Hz (40.0f) // Hz - 10~30% of rated frequency of the motor - Rebuild the project and load the code into the controller, run the project by clicking on the
button, or click Run → Resume in the Debug tab. The systemVars.flagEnableSystem needs to be set to "1" after a fixed time, that means the offsets calibration have been done and the power relay for inrush is turned on. The motor fault flags motorVars_M1.faultMtrUse.all need to be equal to "0", if not, check the current and voltage sensing circuit as described in Section 3.3.4.1.
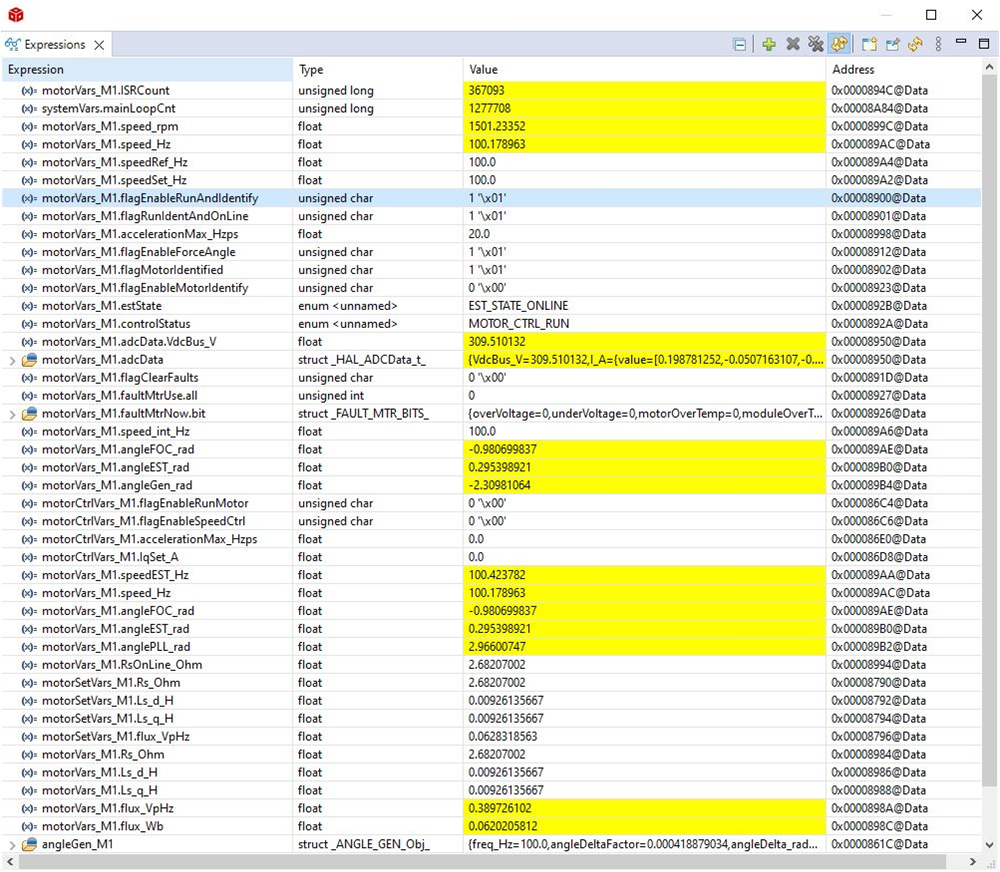
- Set the variable motorVars_M1.flagEnableRunAndIdentify to "1" in the Expressions window as shown in Figure 3-36, the motor identification can be executed, the whole process takes about 150 s. Once motorVars_M1.flagEnableRunAndIdentify is equal to "0", the motor parameters have been identified. Record the watch window values with the newly-defined motor parameters in user_mtr1.h as follows:
- USER_MOTOR1_Rs = motorVars_M1.Rs_Ohm’s value
- USER_MOTOR1_Ls_d = motorVars_M1.Ls_d_H’s value
- USER_MOTOR1_Ls_q = motorVars_M1.Ls_q_H’s value
- USER_MOTOR_RATED_FLUX = motorVars_M1.flux_VpHz’s value
- Set both userParams_M1.flag_bypassMotorId to "true" after successfully identify the motors parameters, rebuild the project and load the code into the controller.
- Set the variables motorVars_M1.flagEnableRunAndIdentify equal to "1" again for starting to run the motor.
- Set the variables motorVars_M1.speedRef_Hz to a different value and watch how the motor shaft speed follows.
- To change the acceleration, enter a different acceleration value for the variables motorVars_M1.accelerationMax_Hzps and motorVars_M1.accelerationMax_Hzps.
- The controller can now be halted before setting the motorVars_M1.flagEnableRunAndIdentify to "0", and the debug connection terminated. Fully halting the controller by first clicking the Halt button
on the toolbar or by clicking Target → Halt. Finally, reset the controller by clicking on
or clicking Run → Reset.
- Close the CCS debug session by clicking on Terminate Debug Session
or clicking Run → Terminate.
 Figure 3-36 Build Level 4: Expressions Window at Run Time
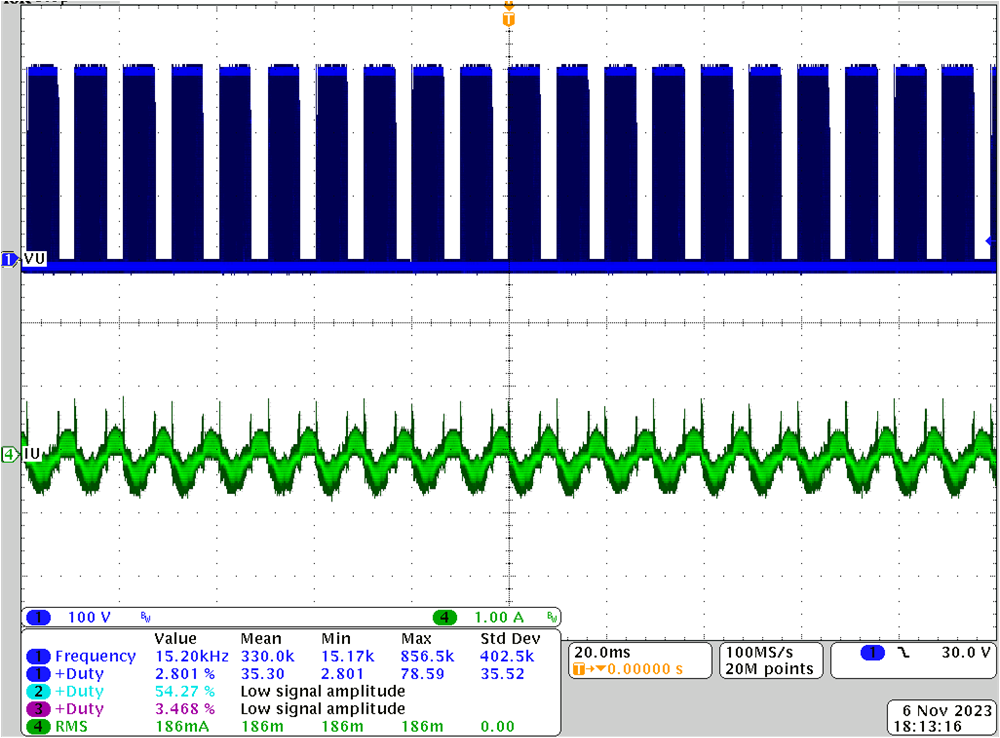
 Figure 3-37 Build Level 4: Rotor Angle, Phase Current of Motor