-
Inductive Sensing: Prototype Side-by-side Coils in Four Easy Steps
Inductive Sensing: Prototype Side-by-side Coils in Four Easy Steps
Luke LaPointe
In my last post, I introduced the LDC0851 differential inductive switch. In this post, I’ll show you how to take readily available Evaluation Modules (EVM) to prototype a side-by-side coil configuration that can be used for a variety of applications including slider switches or rotational event counting.
Inductive switches like the LDC0851 use two coil inductors to sense nearby conductive objects. The push-pull output of the LDC0851 indicates which coil is closer to the metal target. A side-by-side coil arrangement, as shown in Figure 1, is ideal for sensing laterally moving conductive objects and then updating the output when the target crosses the switching threshold as shown in Figure 2.
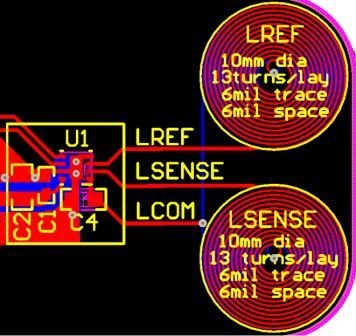 Figure 1 Side-by-side Coil
Arrangement
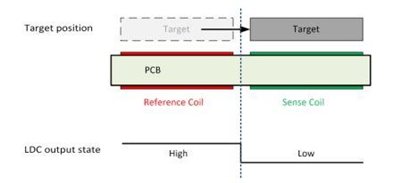 Figure 2 LDC0851 Output with Metal
Interaction
Figure 2 LDC0851 Output with Metal
InteractionSide-by-side coils are best implemented on a single printed circuit board (PCB), but you don’t need to fabricate a PCB to begin prototyping. Now I will show you how to test your own side-by-side coil solution without having to design a PCB in four simple steps.
Step 1: Obtain an LDC0851EVM, which has a perforation along which you can snap off the coil, as shown in Figure 3.
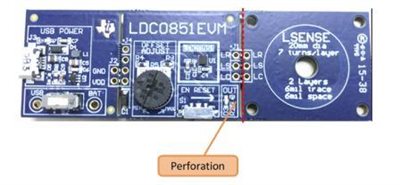 Figure 3 LDC0851EVM With Detachable Coil
Step 2: Obtain two LDCCOILEVM boards with which to prototype your side-by-side coil arrangement. There are 19 unique coils to choose from depending on your sensing requirements, but for this application, snap off coil M from each board, as shown in Figure 4.
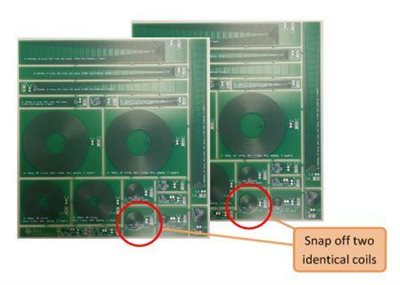 Figure 4 Snap off Two Identical Coils
from the LDCCOILEVM
Figure 4 Snap off Two Identical Coils
from the LDCCOILEVMStep 3: Connect the two coils together and solder them to the LR, LS and LC terminals of the LDC0851EVM, as shown in Figure 5.
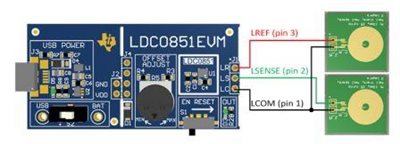 Figure 5 Connecting the Sensor Coils to
the LR, LS and LC Terminals of J1
Figure 5 Connecting the Sensor Coils to
the LR, LS and LC Terminals of J1You will not have to solder a capacitor on the sensor coils themselves. The sensor capacitor, C4, is located on the LDC0851EVM itself which sets the frequency; for most prototyping you can leave it at the default setting, 68 pF. Keep the wire lengths as short as possible to improve the sensor Q factor, and keep some physical distance between the LCOM wires and the other LSENSE and LREF pins to minimize parasitic coupling and improve matching. Closely matched sensor characteristics and parasitics maximize sensitivity to conductive objects.
Step 4: Enable basic operation mode by making the modifications to the LDC0851EVM shown in Figure 6.
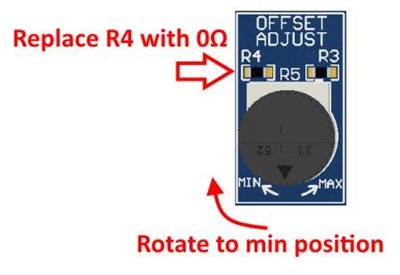 Figure 6 LDC0851EVM Modifications for
Basic Operation
Figure 6 LDC0851EVM Modifications for
Basic OperationNow you are ready to prototype! Figure 7 shows the final implementation with adjacent sense and reference coils and soldered connections.
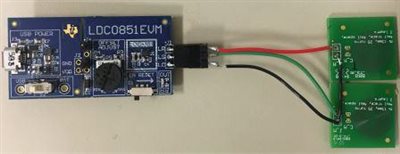 Figure 7 Prototype with Side-by-side
Coils
Figure 7 Prototype with Side-by-side
CoilsBy following the steps outlined in this post, you can start prototyping and testing side-by-side coils within minutes without designing custom PCBs. Stay tuned for my next blog post, where I’ll discuss how and when to use the built-in threshold adjustment (ADJ).
You can read my previous posts here.
Additional Resources
- Download the LDC0851 data sheet.
- See all inductive sensing blog posts here.
- Read more about the LDC0851 in my last Analog Wire blog post.