SLVSGY2 October   2023 TPS2HCS10-Q1

ADVANCE INFORMATION  

  1.   1
  2. Features
  3. Applications
  4. Description
  5. Revision History
  6. Pin Configuration and Functions
    1. 5.1 Recommended Connections for Unused Pins
  7. Specifications
    1. 6.1 Absolute Maximum Ratings
    2. 6.2 ESD Ratings
    3. 6.3 Recommended Operating Conditions
    4. 6.4 Thermal Information
    5. 6.5 Electrical Characteristics
    6. 6.6 SPI Timing Requirements
    7. 6.7 Switching Characteristics
  8. Parameter Measurement Information
  9. Detailed Description
    1. 8.1 Overview
    2. 8.2 Functional Block Diagram
    3. 8.3 Feature Description
      1. 8.3.1 Protection Mechanisms
        1. 8.3.1.1 Programmable Fuse Protection
        2. 8.3.1.2 Thermal Shutdown
        3. 8.3.1.3 Overcurrent Protection And Capacitive Load Charging
        4. 8.3.1.4 Reverse Battery
      2. 8.3.2 Diagnostic Mechanisms
        1. 8.3.2.1 VOUT Short-to-Battery and Open-Load
          1. 8.3.2.1.1 Detection With Channel Output (FET) Enabled
          2. 8.3.2.1.2 Detection With Channel Output Disabled
        2. 8.3.2.2 Digital Current Sense Output
          1. 8.3.2.2.1 RSNS Value and Accuracy / Resolution of Current Measurement
            1. 8.3.2.2.1.1 High Accuracy Load Current Sense
            2. 8.3.2.2.1.2 SNS Output Filter
        3. 8.3.2.3 Output Voltage and FET Temperature Sensing
    4. 8.4 Device Functional Modes
      1. 8.4.1 State Diagram
      2. 8.4.2 SLEEP
      3. 8.4.3 CONFIG/ACTIVE
      4. 8.4.4 Battery Supply Input (VBB) Under-voltage
      5. 8.4.5 LOW POWER MODE (LPM) State
      6. 8.4.6 LIMP HOME state
      7. 8.4.7 SPI Mode Operation
    5. 8.5 TPS2HC10S Registers
  10. Application and Implementation
    1. 9.1 Application Information
    2. 9.2 Typical Application
      1. 9.2.1 Design Requirements
      2. 9.2.2 Detailed Design Procedure
        1. 9.2.2.1 Thermal Considerations
        2. 9.2.2.2 Configuring the Capacitive Charging Mode
    3. 9.3 Power Supply Recommendations
    4. 9.4 Layout
      1. 9.4.1 Layout Guidelines
      2. 9.4.2 Layout Example
  11. 10Device and Documentation Support
    1. 10.1 Documentation Support
      1. 10.1.1 Related Documentation
    2. 10.2 Receiving Notification of Documentation Updates
    3. 10.3 Support Resources
    4. 10.4 Trademarks
    5. 10.5 Electrostatic Discharge Caution
    6. 10.6 Glossary
  12. 11Mechanical, Packaging, and Orderable Information
    1. 11.1 Tape and Reel Information

Package Options

Refer to the PDF data sheet for device specific package drawings

Mechanical Data (Package|Pins)
  • PWP|16
Thermal pad, mechanical data (Package|Pins)
Orderable Information

Reverse Battery

In the reverse battery condition, the switch will automatically be enabled regardless of the state of the output (set by the SW_STATE register) to prevent excess power dissipation inside the MOSFET body diode. In many applications (for example, resistive loads), the full load current may be present during reverse battery. In order to activate the automatic switch on feature, the DI pin must have a path to ground from either from the MCU or it needs to be tied to ground through RPROT if unused.

There are two options for blocking reverse current in the system. The first option is to place a blocking device (FET or diode) in series with the battery supply, blocking all current paths. The second option is to place a blocking diode in series with the GND node of the high-side switch. This method will protect the controller portion of the switch (path 2), but it will not prevent current from flowing through the load (path 3). The diode used for the second option may be shared amongst multiple high-side switches.
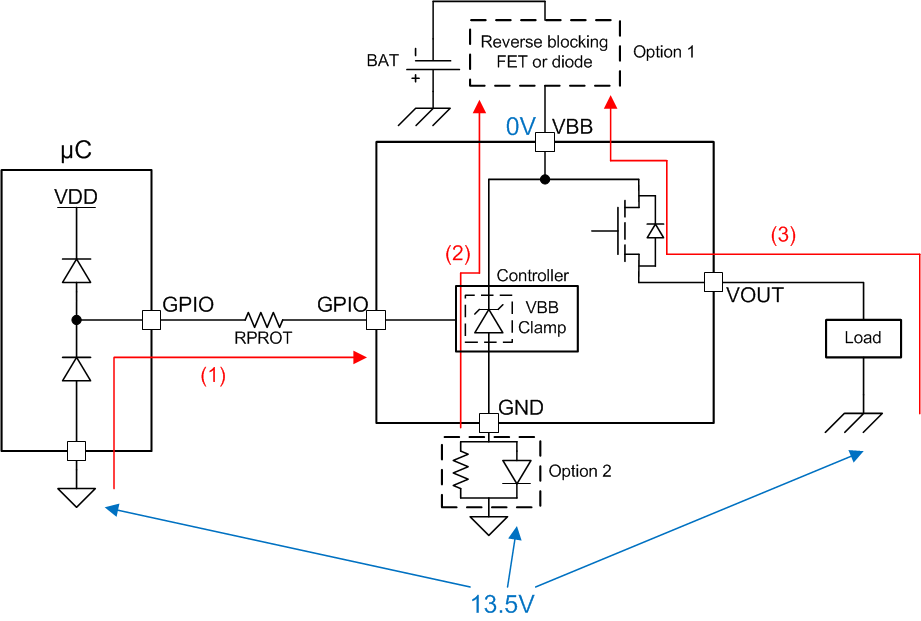
GUID-5194DEFC-26F6-4B79-9872-C891E81D2258-low.gifFigure 8-6 Current Path During Reverse Battery

For more information on reverse battery protection, refer to TI's Reverse Battery Protection for High Side Switches application note.