JAJSVE9 July   2024 BQ25820

PRODUCTION DATA  

  1.   1
  2. 特長
  3. アプリケーション
  4. 概要
  5. Device Comparison
  6. Pin Configuration and Functions
  7. Specifications
    1. 6.1 Absolute Maximum Ratings
    2. 6.2 ESD Ratings
    3. 6.3 Recommended Operating Conditions
    4. 6.4 Thermal Information
    5. 6.5 Electrical Characteristics
    6. 6.6 Timing Requirements
    7. 6.7 Typical Characteristics (BQ25820)
  8. Detailed Description
    1. 7.1 Overview
    2. 7.2 Functional Block Diagram
    3. 7.3 Feature Description
      1. 7.3.1 Device Power-On-Reset
      2. 7.3.2 Device Power-Up From Battery Without Input Source
      3. 7.3.3 Device Power Up from Input Source
        1. 7.3.3.1 VAC Operating Window Programming (ACUV and ACOV)
        2. 7.3.3.2 MODE Pin Configuration
        3. 7.3.3.3 REGN Regulator (REGN LDO)
        4. 7.3.3.4 Switching Frequency and Synchronization (FSW_SYNC)
        5. 7.3.3.5 Device HIZ Mode
      4. 7.3.4 Battery Charging Management
        1. 7.3.4.1 Autonomous Charging Cycle
          1. 7.3.4.1.1 Charge Current Programming (ICHG pin and ICHG_REG)
        2. 7.3.4.2 Li-Ion Battery Charging Profile
        3. 7.3.4.3 LiFePO4 Battery Charging Profile
        4. 7.3.4.4 Charging Termination for Li-ion and LiFePO4
        5. 7.3.4.5 Charging Safety Timer
        6. 7.3.4.6 Thermistor Qualification
          1. 7.3.4.6.1 JEITA Guideline Compliance in Charge Mode
          2. 7.3.4.6.2 Cold/Hot Temperature Window in Reverse Mode
      5. 7.3.5 Power Path Management
        1. 7.3.5.1 Dynamic Power Management: Input Voltage and Input Current Regulation
          1. 7.3.5.1.1 Input Current Regulation
            1. 7.3.5.1.1.1 ILIM_HIZ Pin
          2. 7.3.5.1.2 Input Voltage Regulation
            1. 7.3.5.1.2.1 Max Power Point Tracking (MPPT) for Solar PV Panel
      6. 7.3.6 Reverse Mode Power Direction
      7. 7.3.7 Integrated 16-Bit ADC for Monitoring
      8. 7.3.8 Status Outputs (PG, STAT1, STAT2, and INT)
        1. 7.3.8.1 Power Good Indicator (PG)
        2. 7.3.8.2 Charging Status Indicator (STAT1, STAT2 Pins)
        3. 7.3.8.3 Interrupt to Host (INT)
      9. 7.3.9 Serial Interface
        1. 7.3.9.1 Data Validity
        2. 7.3.9.2 START and STOP Conditions
        3. 7.3.9.3 Byte Format
        4. 7.3.9.4 Acknowledge (ACK) and Not Acknowledge (NACK)
        5. 7.3.9.5 Target Address and Data Direction Bit
        6. 7.3.9.6 Single Write and Read
        7. 7.3.9.7 Multi-Write and Multi-Read
    4. 7.4 Device Functional Modes
      1. 7.4.1 Host Mode and Default Mode
      2. 7.4.2 Register Bit Reset
    5. 7.5 BQ25820 Registers
  9. Application and Implementation
    1. 8.1 Application Information
    2. 8.2 Typical Applications
      1. 8.2.1 Typical Application
        1. 8.2.1.1 Design Requirements
        2. 8.2.1.2 Detailed Design Procedure
          1. 8.2.1.2.1 ACUV / ACOV Input Voltage Operating Window Programming
          2. 8.2.1.2.2 Charge Voltage Selection
          3. 8.2.1.2.3 Switching Frequency Selection
          4. 8.2.1.2.4 Inductor Selection
          5. 8.2.1.2.5 Input (VAC / SYS) Capacitor
          6. 8.2.1.2.6 Output (VBAT) Capacitor
          7. 8.2.1.2.7 Sense Resistor (RAC_SNS and RBAT_SNS) and Current Programming
          8. 8.2.1.2.8 Power MOSFETs Selection
          9. 8.2.1.2.9 ACFETs and BATFETs Selection
        3. 8.2.1.3 Application Curves
  10. Power Supply Recommendations
  11. 10Layout
    1. 10.1 Layout Guidelines
    2. 10.2 Layout Example
  12. 11Device and Documentation Support
    1. 11.1 Device Support
      1. 11.1.1 サード・パーティ製品に関する免責事項
    2. 11.2 ドキュメントの更新通知を受け取る方法
    3. 11.3 サポート・リソース
    4. 11.4 Trademarks
    5. 11.5 静電気放電に関する注意事項
    6. 11.6 用語集
  13. 12Revision History
  14. 13Mechanical, Packaging, and Orderable Information

パッケージ・オプション

デバイスごとのパッケージ図は、PDF版データシートをご参照ください。

メカニカル・データ(パッケージ|ピン)
  • RRV|36
サーマルパッド・メカニカル・データ
発注情報

Layout Example

Based on the above layout guidelines, the PCB layout example top view is shown below including all the key power components.
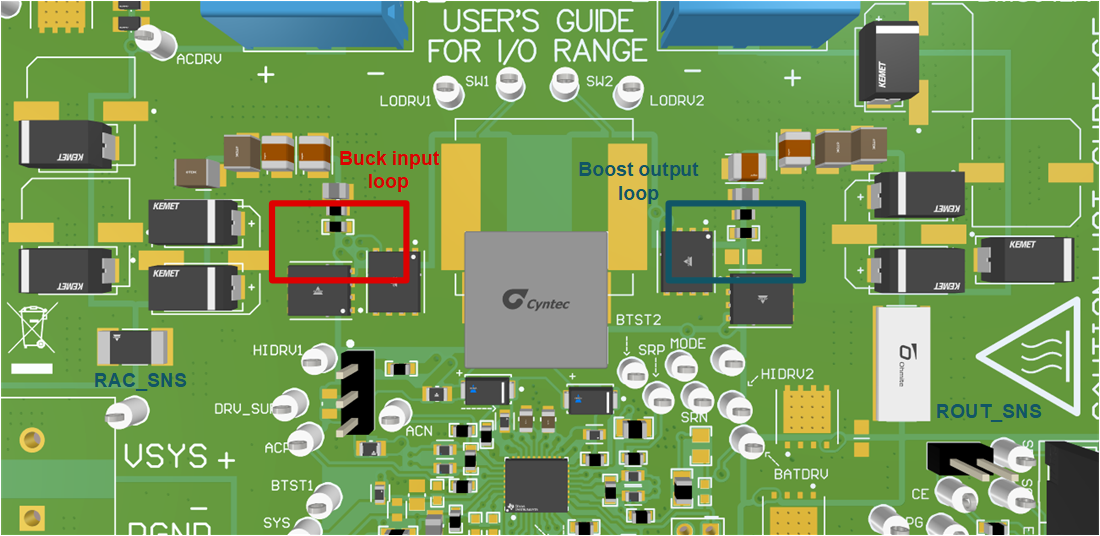
BQ25820 PCB Layout Reference Example Top
          View Figure 10-1 PCB Layout Reference Example Top View

For both input and output current sensing resistors, differential sensing and routing method are suggested and highlighted in figure below. Use wide trace for gate drive traces, minimum 20-mil trace width. Connect all analog grounds to a dedicated low-impedance copper plane, which is tied to the power ground underneath the IC exposed pad.
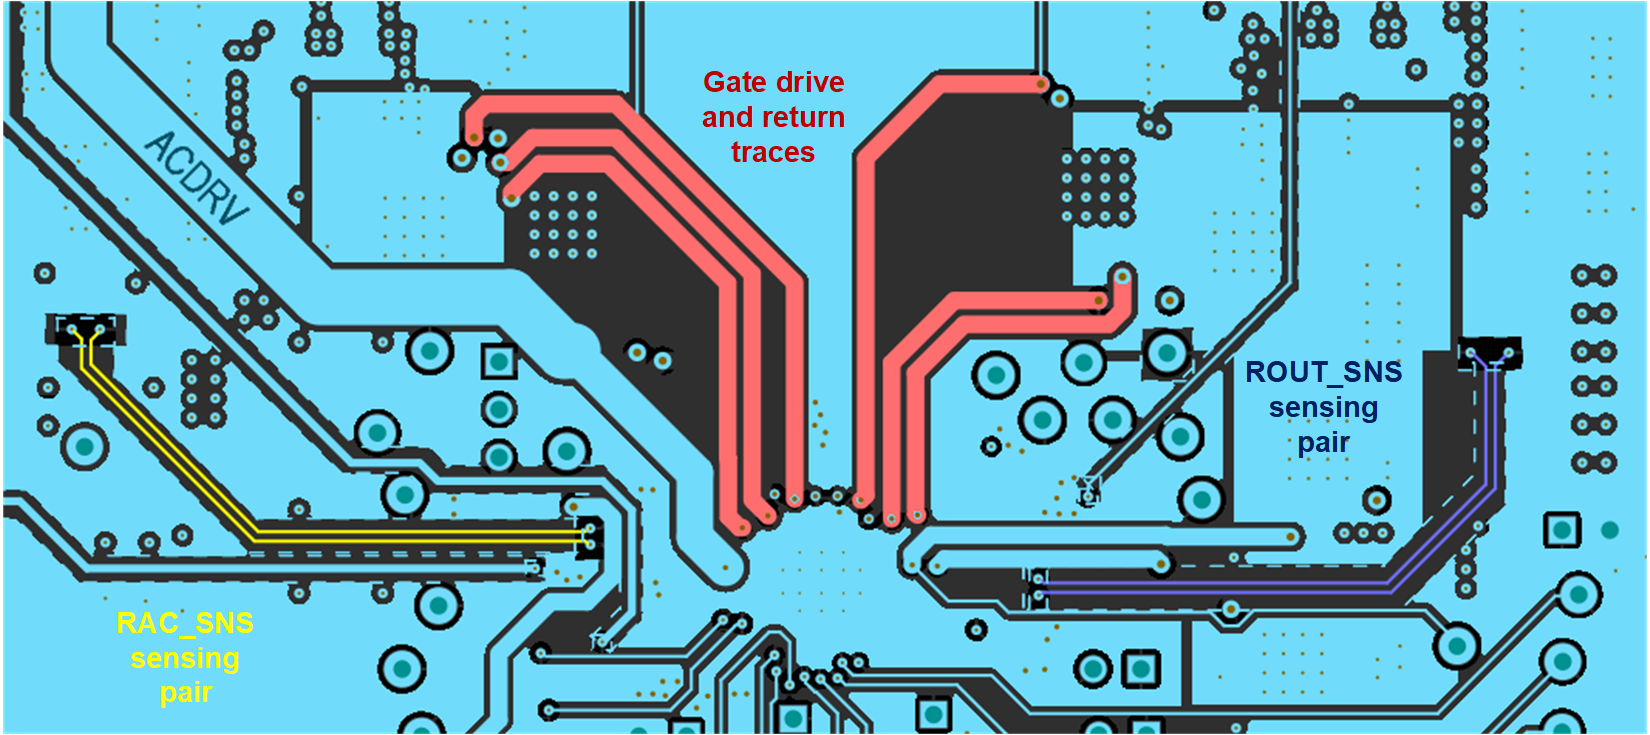
BQ25820 PCB Layout Gate Drive and Current Sensing Signal Layer Routing Figure 10-2 PCB Layout Gate Drive and Current Sensing Signal Layer Routing