JAJS755I May 1999 – October 2016 LM2991
PRODUCTION DATA.
- 1 特長
- 2 アプリケーション
- 3 概要
- 4 改訂履歴
- 5 Pin Configuration and Functions
- 6 Specifications
- 7 Detailed Description
- 8 Application and Implementation
- 9 Power Supply Recommendations
- 10Layout
- 11デバイスおよびドキュメントのサポート
- 12メカニカル、パッケージ、および注文情報
パッケージ・オプション
メカニカル・データ(パッケージ|ピン)
サーマルパッド・メカニカル・データ
- KTT|5
発注情報
5 Pin Configuration and Functions
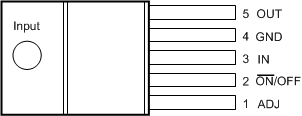
KC and NDH Packages
5-Pin TO-220
Top View

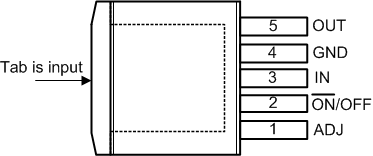
KTT Package
5-Pin DDPAK/TO-263
Top View

Pin Functions
| PIN | I/O | DESCRIPTION | |
|---|---|---|---|
| NO. | NAME | ||
| 1 | ADJ | I | Feedback pin to the control loop for programming the output voltage. |
| 2 | ON/OFF | I | Logic high enable input |
| 3 | IN | I | Negative Input voltage. Internally connected directly to the thermal tab. |
| 4 | GND | — | Ground |
| 5 | OUT | O | Regulated output voltage |
| — | TAB | I | Negative Input voltage. Internally connected directly to the device pin 3. The thermal tab must be connected to a copper area on the PCB at the same potential as device pin 3 (IN) to assure thermal performance, or leave the thermal tab floating. Do NOT connect the thermal tab to any potential other than the same potential at device pin 3. Do NOT connect the thermal tab to ground. |