SLAAEE6 October   2023 MSPM0L1306 , MSPM0L1306


  1.   1
  2.   Abstract
  3.   Trademarks
  4. 1Introduction
  5. 2Hardware Introduction
  6. 3Software Introduction
  7. 4Gauge GUI Introduction
  8. 5Current Detection and Calibration Method
    1. 5.1 MSPM0 OPA Introduction
      1. 5.1.1 OPA input and output limitation
      2. 5.1.2 OPA Accuracy Influence
    2. 5.2 Current Detection Method
    3. 5.3 Current Calibration Method
      1. 5.3.1 (R1+R2)/R2 calibration
      2. 5.3.2 OPA1 Voffset calibration
      3. 5.3.3 R3/(R4+R3) calibration
      4. 5.3.4 Vref calibration
  9. 6Solution Evaluation Steps
    1. 6.1 Step1: Hardware Preparation
    2. 6.2 Step2: Evaluation
  10. 7MSPM0 Gauge Solution Test Results
    1. 7.1 Calibration Test Result
    2. 7.2 Current Detection Result
      1. 7.2.1 Test Under 25°C
      2. 7.2.2 Test Under 0°C
      3. 7.2.3 Test Under 50°C
      4. 7.2.4 Conclusion
    3. 7.3 Current Consumption Test
  11. 8Solution Summery and Improvement Direction
    1. 8.1 Shunter Resistor
    2. 8.2 ADC and its Reference
    3. 8.3 Runtime Calibration

Current Calibration Method

This section shows how to use ADC to calibrate the circuit in order to get a more accurate result.

To realize this calibration, you need to make some changes to the peripheral setting. For these working structures and used ADC channels, see Figure 5-4. For the total calibration, it is suggested to do it under 0 loading/charger. Otherwise, it influences the GAIN factor calibration accuracy. For the condition when the current cannot ensure to be 0 after the MCU power on, see Section 8.3 for a further description. In the following part, every calibration detail following the real code calibration flow is shown.
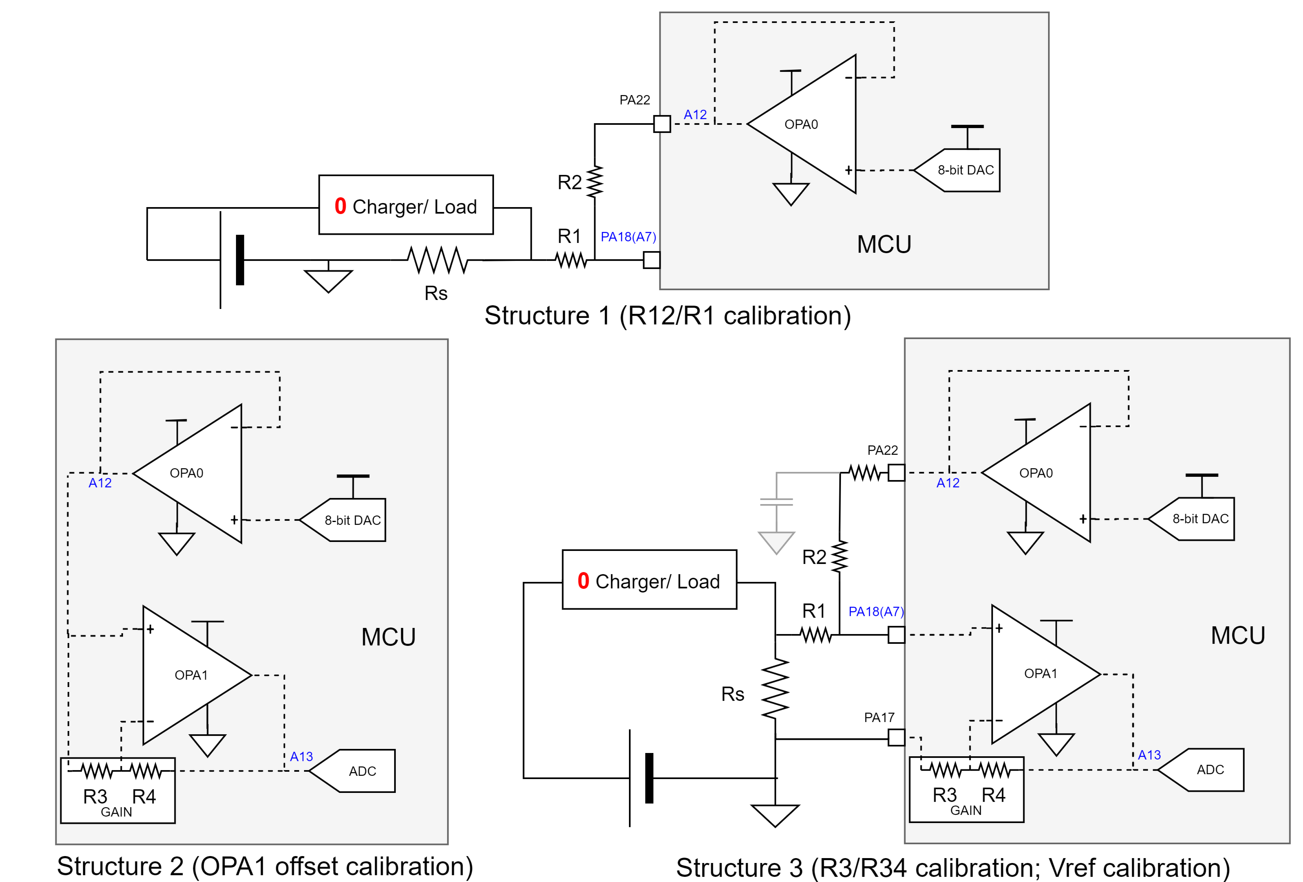
GUID-B738038A-22B6-4B8C-BE42-D628E47E6A8D-low.png Figure 5-4 Current Calibration Structure