SLVUCP8 September   2024 TPS26750


  1.   1
  2.   Description
  3.   Get Started
  4.   Features
  5.   Applications
  6.   6
  7. 1Evaluation Module Overview
    1. 1.1 Introduction
    2. 1.2 Kit Contents
    3. 1.3 Specification
    4. 1.4 Device Information
  8. 2Hardware
    1. 2.1 Additional Images
    2. 2.2 Power Requirements
    3. 2.3 Setup
    4. 2.4 Header Information
    5. 2.5 Jumper Information
    6. 2.6 Push Buttons
    7. 2.7 Interfaces
    8. 2.8 Debug Information
    9. 2.9 Test Points and LEDS
  9. 3Software
    1. 3.1 Software Description
    2. 3.2 Software Installation
      1. 3.2.1 Web Browser
      2. 3.2.2 Native Application
    3. 3.3 Software Development
    4. 3.4 Using the Application Customization Tool
      1. 3.4.1 Default View
      2. 3.4.2 Selecting a Configuration
      3. 3.4.3 Filling Out the Questionnaire
      4. 3.4.4 Advanced Configuration Mode
      5. 3.4.5 Flashing Configuration to TPS26750
      6. 3.4.6 Additional Settings
        1. 3.4.6.1 Generating a New Configuration
        2. 3.4.6.2 Exporting and Importing Settings
        3. 3.4.6.3 Generating the Binary
        4. 3.4.6.4 Generating the VIF File
  10. 4Application Specific Use Cases
    1. 4.1 Liquid Detection and Corrosion Mitigation Overview
      1. 4.1.1 Liquid Detection and Corrosion Mitigation Hardware Setup
      2. 4.1.2 Liquid Detection and Corrosion Mitigation Software Setup
      3. 4.1.3 Liquid Detection Detailed Implementation
        1. 4.1.3.1 Liquid Detection Config Register (0x98)
    2. 4.2 Use With the BQ25756EVM
      1. 4.2.1 Hardware Setup with BQ25756EVM
      2. 4.2.2 Software Setup with the BQ25756EVM
  11. 5Hardware Design Files
    1. 5.1 Schematics
    2. 5.2 PCB Layouts
    3. 5.3 Bill of Materials (BOM)
  12. 6Additional Information
    1. 6.1 Trademarks
    2. 6.2 Electrostatic Discharge Caution
    3. 6.3 Terminology
    4. 6.4 Device Support
      1. 6.4.1 Third-Party Products Disclaimer
      2. 6.4.2 Supplemental Content
    5. 6.5 Documentation Support
    6. 6.6 Receiving Notification of Documentation Updates
    7. 6.7 Support Resources

Test Points and LEDS

LED Information


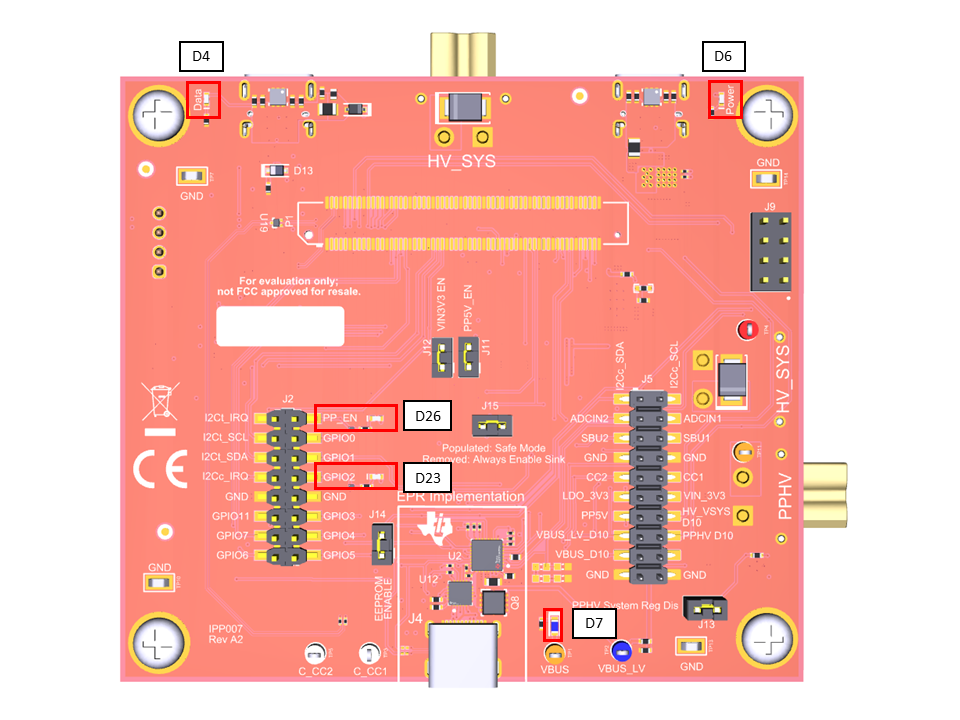
TPS26750EVM Location of LEDs

Figure 2-12 Location of LEDs
Table 2-6 LEDS
Designator Net Label Description
D4 RP_VBUS Blue LED that turns on when USB Type-C is connected to Data Type C Port (J6).
D6 TC_VBUS_C Blue LED that turns on when USB Type-C is connected to Power Type C Port (J3).
D26 NetD26_2 Blue LED that shows when POWER_PATH_EN is driven high to enable the Bidirectional power path (PPHV).
D23 NetD23_2 Blue LED that shows when GPIO2 (EPR_EN) is driven high to show that the TPS26750 is in EPR Mode.
D7 NetD7_2 Blue LED that lights when VBUS is driven at or above 5V.
Table 2-7 Test Points
Name Test Point Description
VBUS TP1 VBUS (5V to 48V)
VBUS_LV TP2 VBUS_LV. Either VBUS in SPR Mode or (VBUS x 42.18750%) in EPR Mode
PPHV TP11 High voltage power path
HV_VSYS TP4 High voltage system power
C_CC1 TP3 Connector side (J4) CC1
C_CC2 TP5 Connector side (J4) CC2
GND TP7, TP10, TP13, TP13 Ground