TIDUES0E June   2019  – April 2024 TMS320F28P550SJ , TMS320F28P559SJ-Q1


  1.   1
  2.   Description
  3.   Resources
  4.   Features
  5.   Applications
  6.   6
  7. 1System Description
    1. 1.1 Key System Specifications
  8. 2System Overview
    1. 2.1 Block Diagram
    2. 2.2 Highlighted Products
      1. 2.2.1  UCC21710
      2. 2.2.2  UCC14141-Q1
      3. 2.2.3  AMC1311
      4. 2.2.4  AMC1302
      5. 2.2.5  OPA320
      6. 2.2.6  AMC1306M05
      7. 2.2.7  AMC1336
      8. 2.2.8  TMCS1133
      9. 2.2.9  TMS320F280039C
      10. 2.2.10 TLVM13620
      11. 2.2.11 ISOW1044
      12. 2.2.12 TPS2640
    3. 2.3 System Design Theory
      1. 2.3.1 Dual Active Bridge Analogy With Power Systems
      2. 2.3.2 Dual-Active Bridge – Switching Sequence
      3. 2.3.3 Dual-Active Bridge – Zero Voltage Switching (ZVS)
      4. 2.3.4 Dual-Active Bridge - Design Considerations
        1. 2.3.4.1 Leakage Inductor
        2. 2.3.4.2 Soft Switching Range
        3. 2.3.4.3 Effect of Inductance on Current
        4. 2.3.4.4 Phase Shift
        5. 2.3.4.5 Capacitor Selection
          1. 2.3.4.5.1 DC-Blocking Capacitors
        6. 2.3.4.6 Switching Frequency
        7. 2.3.4.7 Transformer Selection
        8. 2.3.4.8 SiC MOSFET Selection
      5. 2.3.5 Loss Analysis
        1. 2.3.5.1 SiC MOSFET and Diode Losses
        2. 2.3.5.2 Transformer Losses
        3. 2.3.5.3 Inductor Losses
        4. 2.3.5.4 Gate Driver Losses
        5. 2.3.5.5 Efficiency
        6. 2.3.5.6 Thermal Considerations
  9. 3Circuit Description
    1. 3.1 Power Stage
    2. 3.2 DC Voltage Sensing
      1. 3.2.1 Primary DC Voltage Sensing
      2. 3.2.2 Secondary DC Voltage Sensing
        1. 3.2.2.1 Secondary Side Battery Voltage Sensing
    3. 3.3 Current Sensing
    4. 3.4 Power Architecture
      1. 3.4.1 Auxiliary Power Supply
      2. 3.4.2 Gate Driver Bias Power Supply
      3. 3.4.3 Isolated Power Supply for Sense Circuits
    5. 3.5 Gate Driver Circuit
    6. 3.6 Additional Circuitry
    7. 3.7 Simulation
      1. 3.7.1 Setup
      2. 3.7.2 Running Simulations
  10. 4Hardware, Software, Testing Requirements, and Test Results
    1. 4.1 Required Hardware and Software
      1. 4.1.1 Hardware
      2. 4.1.2 Software
        1. 4.1.2.1 Getting Started With Software
        2. 4.1.2.2 Pin Configuration
        3. 4.1.2.3 PWM Configuration
        4. 4.1.2.4 High-Resolution Phase Shift Configuration
        5. 4.1.2.5 ADC Configuration
        6. 4.1.2.6 ISR Structure
    2. 4.2 Test Setup
    3. 4.3 PowerSUITE GUI
    4. 4.4 LABs
      1. 4.4.1 Lab 1
      2. 4.4.2 Lab 2
      3. 4.4.3 Lab 3
      4. 4.4.4 Lab 4
      5. 4.4.5 Lab 5
      6. 4.4.6 Lab 6
      7. 4.4.7 Lab 7
    5. 4.5 Test Results
      1. 4.5.1 Closed-Loop Performance
  11. 5Design Files
    1. 5.1 Schematics
    2. 5.2 Bill of Materials
    3. 5.3 Altium Project
    4. 5.4 Gerber Files
    5. 5.5 Assembly Drawings
  12. 6Related Documentation
    1. 6.1 Trademarks
  13. 7Terminology
  14. 8About the Author
  15. 9Revision History

Getting Started With Software

  1. Install Code Composer Studio (CSS)
  2. Download and install C2000WARE-DIGITALPOWER-SDK
  3. Open CCS, go to project → Import project and browse to the folder C:\ti\c2000\C2000Ware_DigitalPower_SDK_5_02_00_00\solutions\tida_010054\f28003x\ccs. The DAB project is listed. Complete the steps to import the project. (For newer versions of C2000Ware the install path can differ)
  4. The code is designed for the F28003x control card.Figure 4-1 shows the loaded project explorer view. Open main.syscfg in the Project Explorer window, choose lab and then compile, then program the device.
  5. Once loaded, enable real-time mode and run the code.
  6. To add the variables in the watch or expressions window, click View → Scripting Console to open the scripting console dialog box. On the upper right corner of this console, click on Open and then browse to the “setupdebugenv_lab1.js” script file located inside the project folder. This populates the watch window with appropriate variables needed to debug the system.
  7. Select the Continuous Refresh button on the watch window to enable continuous updates of values from the controller. Figure 4-13 illustrates the watch window.
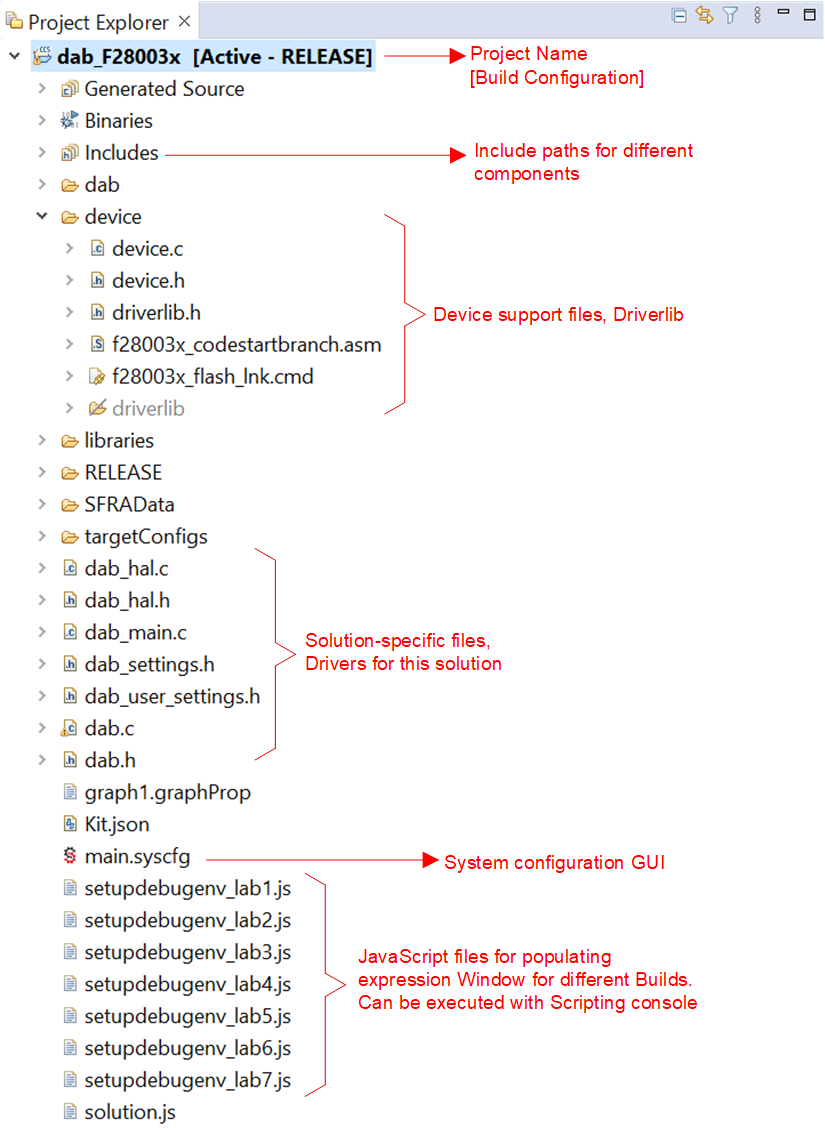
TIDA-010054 Project Explorer ViewFigure 4-1 Project Explorer View