SPRADL6 January 2025 F29H850TU , F29H859TU-Q1 , TMS320F2800132 , TMS320F2800133 , TMS320F2800135 , TMS320F2800137 , TMS320F2800152-Q1 , TMS320F2800153-Q1 , TMS320F2800154-Q1 , TMS320F2800155 , TMS320F2800155-Q1 , TMS320F2800156-Q1 , TMS320F2800157 , TMS320F2800157-Q1 , TMS320F280021 , TMS320F280021-Q1 , TMS320F280023 , TMS320F280023-Q1 , TMS320F280023C , TMS320F280025 , TMS320F280025-Q1 , TMS320F280025C , TMS320F280025C-Q1 , TMS320F280033 , TMS320F280034 , TMS320F280034-Q1 , TMS320F280036-Q1 , TMS320F280036C-Q1 , TMS320F280037 , TMS320F280037-Q1 , TMS320F280037C , TMS320F280037C-Q1 , TMS320F280038-Q1 , TMS320F280038C-Q1 , TMS320F280039 , TMS320F280039-Q1 , TMS320F280039C , TMS320F280039C-Q1 , TMS320F280040-Q1 , TMS320F280040C-Q1 , TMS320F280041 , TMS320F280041-Q1 , TMS320F280041C , TMS320F280041C-Q1 , TMS320F280045 , TMS320F280048-Q1 , TMS320F280048C-Q1 , TMS320F280049 , TMS320F280049-Q1 , TMS320F280049C , TMS320F280049C-Q1 , TMS320F28075 , TMS320F28075-Q1 , TMS320F2808 , TMS320F2808-Q1 , TMS320F2809 , TMS320F2810 , TMS320F2810-Q1 , TMS320F2811 , TMS320F2811-Q1 , TMS320F2812 , TMS320F2812-Q1 , TMS320F28232 , TMS320F28232-Q1 , TMS320F28234 , TMS320F28234-Q1 , TMS320F28235 , TMS320F28235-Q1 , TMS320F28332 , TMS320F28333 , TMS320F28334 , TMS320F28335 , TMS320F28335-Q1 , TMS320F28374D , TMS320F28374S , TMS320F28375D , TMS320F28375S , TMS320F28375S-Q1 , TMS320F28376D , TMS320F28376S , TMS320F28377D , TMS320F28377D-EP , TMS320F28377D-Q1 , TMS320F28377S , TMS320F28377S-Q1 , TMS320F28379D , TMS320F28379D-Q1 , TMS320F28379S , TMS320F28384D , TMS320F28384S , TMS320F28386D , TMS320F28386S , TMS320F28388D , TMS320F28388S , TMS320F28P550SJ , TMS320F28P559SJ-Q1 , TMS320F28P650DH , TMS320F28P650DK , TMS320F28P650SH , TMS320F28P650SK , TMS320F28P659DH-Q1 , TMS320F28P659DK-Q1 , TMS320F28P659SH-Q1
2.1.2 Install C2000 IDEA Extension
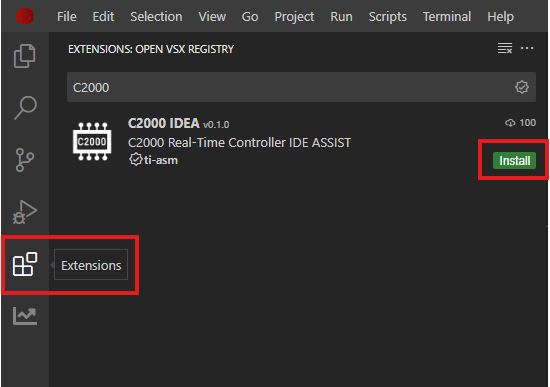
Follow these instructions to install the extension to CCS:
- Navigate to the Extensions tab in the left side bar panel.
- Search for C2000 IDEA and
select install.
 Figure 2-2 C2000 IDEA Setup in
CCS
Figure 2-2 C2000 IDEA Setup in
CCS- If no results are
displayed in the Extension Marketplace, your connection may be
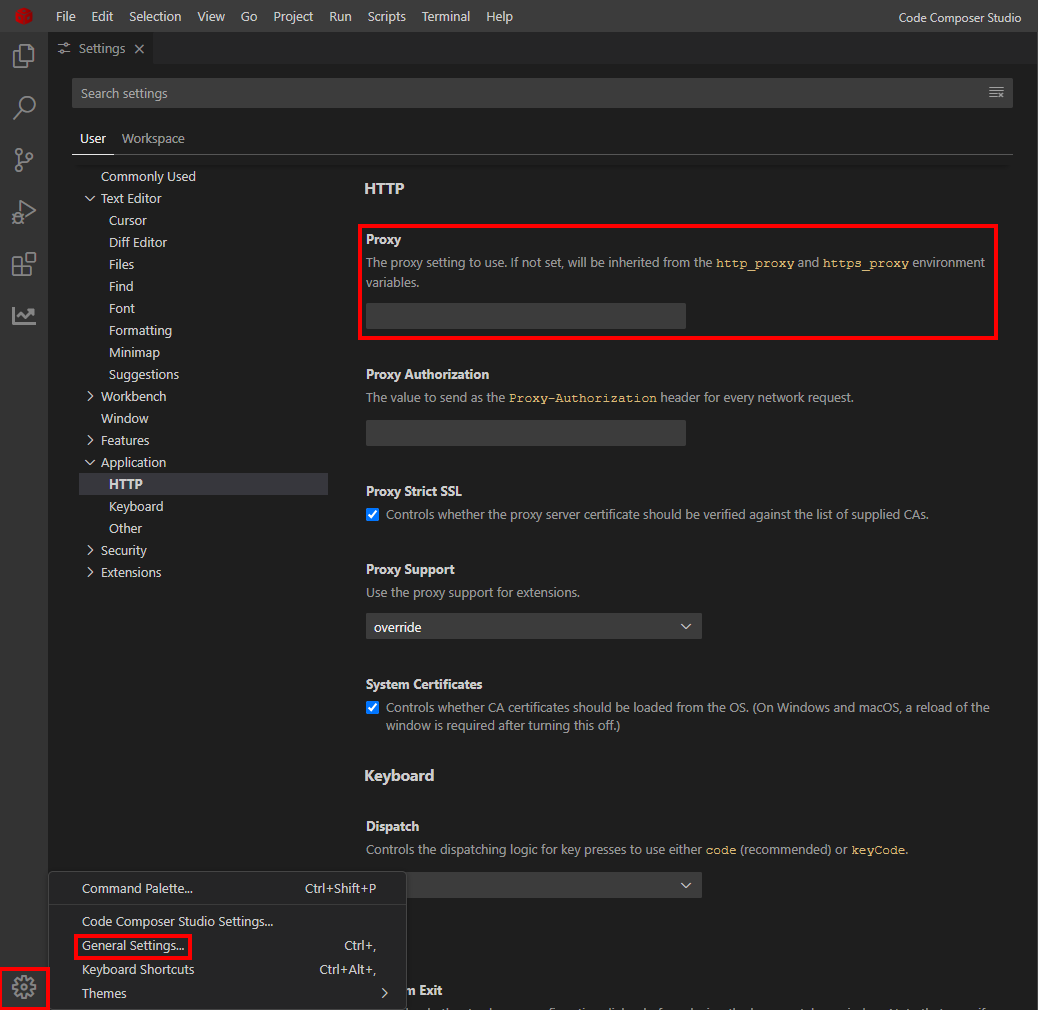
configured to use a proxy server. To set up the proxy settings:
- Click the gear (Manage) icon in the left side bar panel and select Settings.
- Navigate to
Application > Proxy and input proxy information.
 Figure 2-3 Proxy
Setup
- If no results are
displayed in the Extension Marketplace, your connection may be
configured to use a proxy server. To set up the proxy settings:
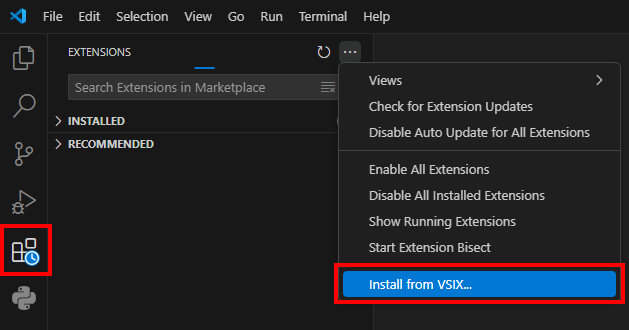
Follow these instructions to install the extension to VS Code:
-
Download the VSIX from OPEN-VSX.
- NOTE: Make sure to always download the latest version. For more information regarding the tool, refer to the C2000-IDEA GitHub repository.
-
Navigate to the Extensions tab in the left side bar panel.
- Click on the three dots and
select the Install from VSIX. Select the downloaded VSIX in the file
explorer.
 Figure 2-4 C2000 IDEA Setup in VS
Code
Refresh the IDE. The extension has been successfully installed when the C2000 IDE Assist icon is present in the left side bar panel on the left side of the screen.