SPRADL6 January 2025 F29H850TU , F29H859TU-Q1 , TMS320F2800132 , TMS320F2800133 , TMS320F2800135 , TMS320F2800137 , TMS320F2800152-Q1 , TMS320F2800153-Q1 , TMS320F2800154-Q1 , TMS320F2800155 , TMS320F2800155-Q1 , TMS320F2800156-Q1 , TMS320F2800157 , TMS320F2800157-Q1 , TMS320F280021 , TMS320F280021-Q1 , TMS320F280023 , TMS320F280023-Q1 , TMS320F280023C , TMS320F280025 , TMS320F280025-Q1 , TMS320F280025C , TMS320F280025C-Q1 , TMS320F280033 , TMS320F280034 , TMS320F280034-Q1 , TMS320F280036-Q1 , TMS320F280036C-Q1 , TMS320F280037 , TMS320F280037-Q1 , TMS320F280037C , TMS320F280037C-Q1 , TMS320F280038-Q1 , TMS320F280038C-Q1 , TMS320F280039 , TMS320F280039-Q1 , TMS320F280039C , TMS320F280039C-Q1 , TMS320F280040-Q1 , TMS320F280040C-Q1 , TMS320F280041 , TMS320F280041-Q1 , TMS320F280041C , TMS320F280041C-Q1 , TMS320F280045 , TMS320F280048-Q1 , TMS320F280048C-Q1 , TMS320F280049 , TMS320F280049-Q1 , TMS320F280049C , TMS320F280049C-Q1 , TMS320F28075 , TMS320F28075-Q1 , TMS320F2808 , TMS320F2808-Q1 , TMS320F2809 , TMS320F2810 , TMS320F2810-Q1 , TMS320F2811 , TMS320F2811-Q1 , TMS320F2812 , TMS320F2812-Q1 , TMS320F28232 , TMS320F28232-Q1 , TMS320F28234 , TMS320F28234-Q1 , TMS320F28235 , TMS320F28235-Q1 , TMS320F28332 , TMS320F28333 , TMS320F28334 , TMS320F28335 , TMS320F28335-Q1 , TMS320F28374D , TMS320F28374S , TMS320F28375D , TMS320F28375S , TMS320F28375S-Q1 , TMS320F28376D , TMS320F28376S , TMS320F28377D , TMS320F28377D-EP , TMS320F28377D-Q1 , TMS320F28377S , TMS320F28377S-Q1 , TMS320F28379D , TMS320F28379D-Q1 , TMS320F28379S , TMS320F28384D , TMS320F28384S , TMS320F28386D , TMS320F28386S , TMS320F28388D , TMS320F28388S , TMS320F28P550SJ , TMS320F28P559SJ-Q1 , TMS320F28P650DH , TMS320F28P650DK , TMS320F28P650SH , TMS320F28P650SK , TMS320F28P659DH-Q1 , TMS320F28P659DK-Q1 , TMS320F28P659SH-Q1
4.3.1.1 File-Based Migration Check
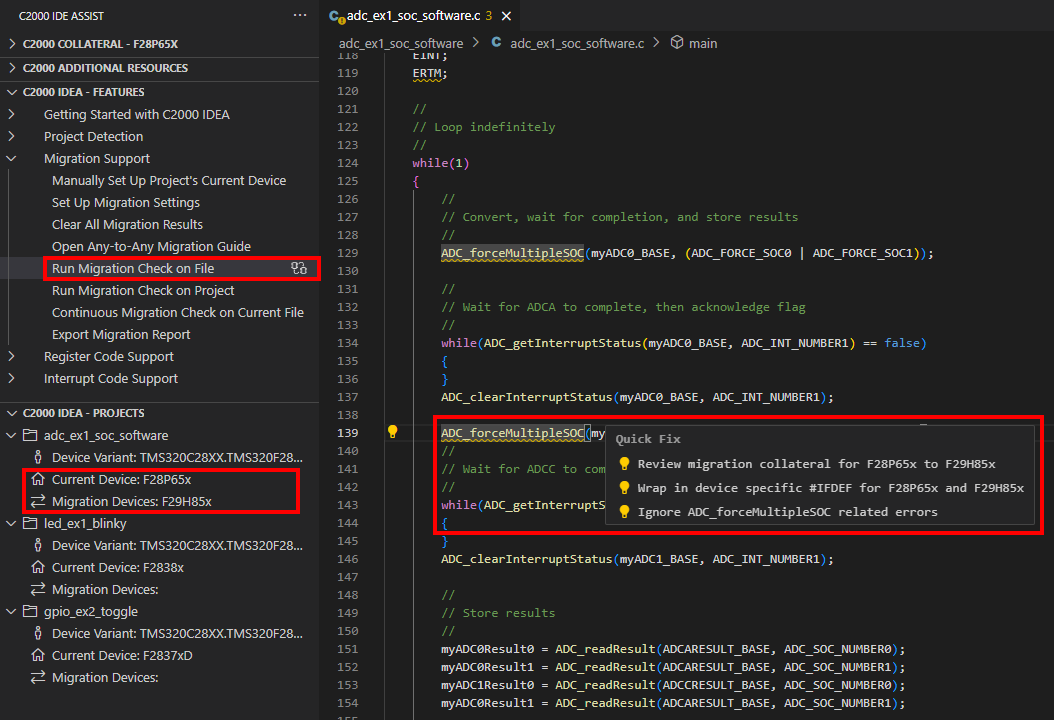
Follow these steps to enable Driverlib Migration on a file:
- Open a C2000 application C-Code file.
- Run the migration check by
either:
- Press CTRL+SHIFT+P, type and select C2000: Run Migration Check on File.
- Click on Migration Support > Run Migration Check on Project in the C2000 IDEA - Features pane of the Extension tree
- Select the current C2000 device the code in the file applies to.
- Select the C2000 device to migrate the file to.
- The status bar at the bottom right of the screen displays Migration check completed when finished. All major migration concerns in the file are underlined with a red squiggly line. All other migration warnings in the file are underlined with a yellow squiggly line.
- Review and resolve concerns
throughout the file. The following options are provided when the underlined code
is hovered over:
- Select View
Problem to quickly loop through the detected concerns in the
file.
 Figure 4-6 Migration
Check - View Problem
 - Select Quick Fix
to mitigate the migration concern. Select one of the below options:
- Review migration collateral for [current device] to [migration device]- This option opens a link to the online migration collateral for the specific migration path using the latest version of C2000WARE.
- Wrap in device specific #IFDEF for [current device] and [migration device] - This option autogenerates pre-processor wrappers around the line of code so that an updated version of the code can be compiled for the new device. Fill in the line with the //Enter alternate code comment with the modified code and add a #define for the current device somewhere in the file.
- Ignore code
related errors - This option ignores this migration
concern.
 Figure 4-7 Migration Check - Quick Fix
- Select View
Problem to quickly loop through the detected concerns in the
file.
- The migration report contains a
list of the detected migration concerns. To export the migration report to the
desired file path, either:
- Enter CTRL+SHIFT+P, type and select C2000: Export Migration Report.
- Click on Migration
Support > Export Migration Report in the C2000
IDEA - Features pane of the Extension tree.
 Figure 4-8 Migration
Report