SLAU887 February 2023 MSPM0G1105 , MSPM0G1106 , MSPM0G1107 , MSPM0G1505 , MSPM0G1506 , MSPM0G1507 , MSPM0G3105 , MSPM0G3105-Q1 , MSPM0G3106 , MSPM0G3106-Q1 , MSPM0G3107 , MSPM0G3107-Q1 , MSPM0G3505 , MSPM0G3505-Q1 , MSPM0G3506 , MSPM0G3506-Q1 , MSPM0G3507 , MSPM0G3507-Q1 , MSPM0L1105 , MSPM0L1106 , MSPM0L1227 , MSPM0L1227-Q1 , MSPM0L1228 , MSPM0L1228-Q1 , MSPM0L1303 , MSPM0L1304 , MSPM0L1304-Q1 , MSPM0L1305 , MSPM0L1305-Q1 , MSPM0L1306 , MSPM0L1306-Q1 , MSPM0L1343 , MSPM0L1344 , MSPM0L1345 , MSPM0L1346 , MSPM0L2227 , MSPM0L2227-Q1 , MSPM0L2228 , MSPM0L2228-Q1
- Abstract
- Trademarks
- 1Overview of BSL Features
- 2Terminology
- 3BSL Architecture
- 4Bootloader Protocol
- 5Sample Program Flow with Bootloader
- 6Secondary Bootloader
- 7Interface Plug-in
- 8References
- 9Revision History
5 Sample Program Flow with Bootloader
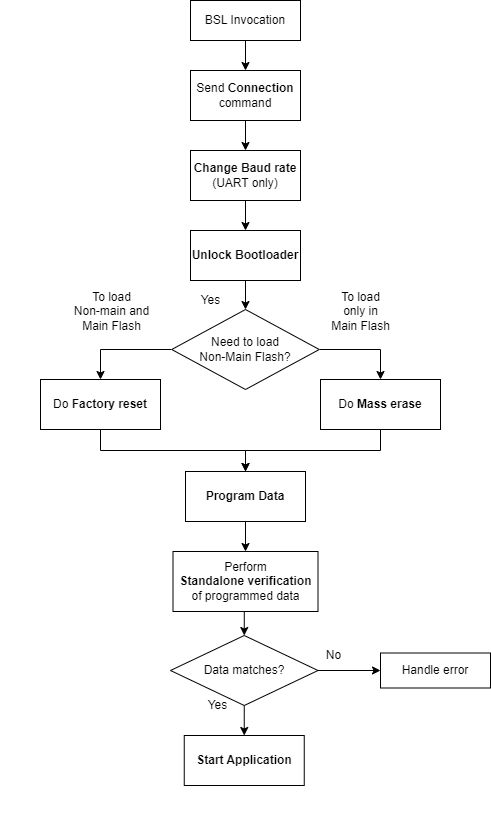
This section explains the typical sequence followed by the BSL host for loading the image through the Bootloader. This sample sequence erases the flash memory and programs new firmware in it.
Bootloader shall be started through Blank device detection, Pin based invocation or Application request.
- Once it is invoked, send the connection command to establish connection with the BSL through the desired interface.
- If UART interface is used, the baud rate can be changed to a higher value, to speed up the further communication and is optional.
- To erase the flash memory completely use the Mass erase command. Only when there is a need to update Non-Main flash use factory reset command. Because if the Non-main flash is erased and left unprogrammed the device is locked.
- Program the firmware image
- Do the CRC verification of the programmed memory region to check the correctness of data programmed. This is an optional step.
- Application can be started with 'Start application' command.
 Figure 5-1 BSL Host Sequence